
Hope you had a great weekend! It’s definitely starting to feel like fall here and I couldn’t be more excited for all the fall activities.
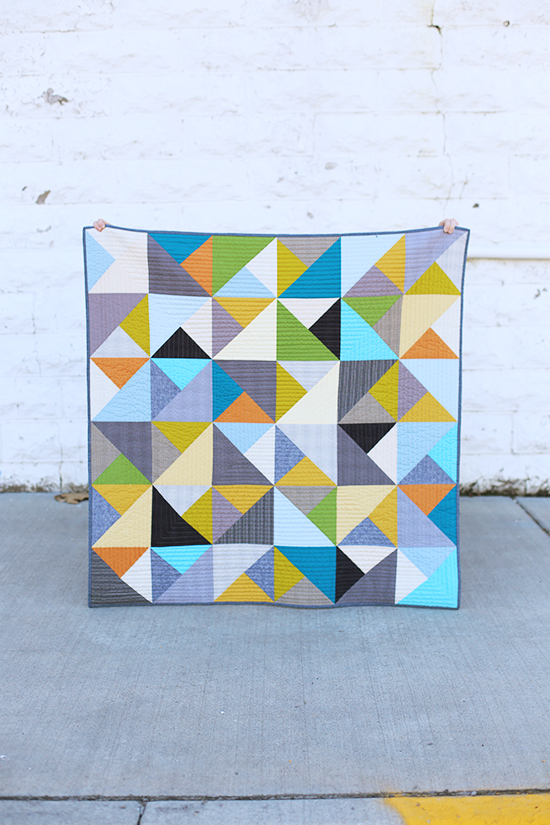
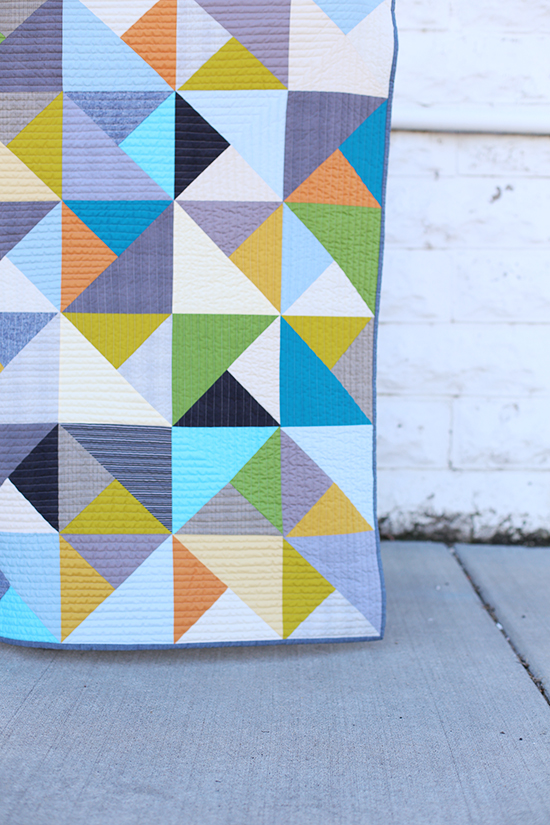
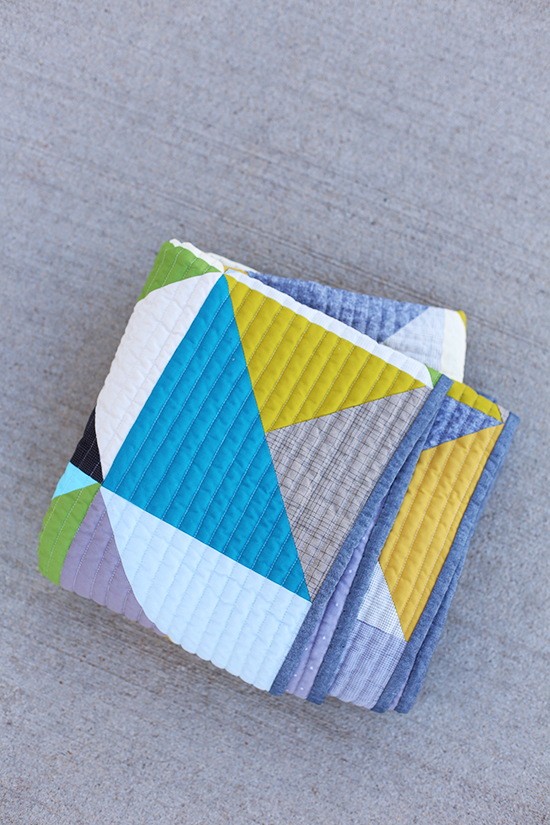
I thought I’d share a quick how-to on making the baby quilt I made a few weeks ago. You can find the original post here. I do want to point out that there are probably many ways to make this quilt. I don’t believe one way is more correct than another, so if you’ve found something that works better for you, go for it. I wanted to make the best use of this 10-square (some manufacturers call this a layer cake, either way, it’s a grouping of 10″ squares) with minimal leftovers and without a lot of planning. Again, this 10-square is by Jennifer Sampou and it’s her Shimmer Coordinates 10-Square.What that means for me is that I made the quilt in a somewhat unconventional way in order to have the most variety among the blocks. Using what I believe to be a more a traditional method, you would have duplicate blocks, but with the small number of full squares in the 10-square, I knew I’d have to do some mixing and matching.
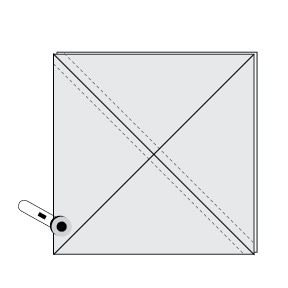
Start by making half square triangles (HSTs). Place two full squares right sides together. Using a ruler and pencil, mark a line diagonally across the top square.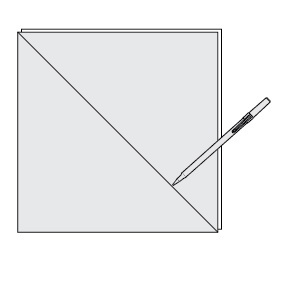
Sew 1/4″ on both sides of the line. Cut on marked line.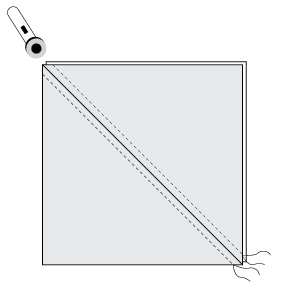
Without picking up block, cut on the diagonal in the other direction. Press seams open. I didn’t plan out how many I made, instead I made 5-6 at a time (chain piecing) until I ran out of full squares to match them up with later on.
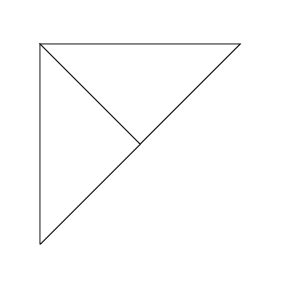
Now you’ll have units that look like this:
Place right sides together with a full square, being sure to grab two different HSTs (this is the key to getting the most variety). Align the cut HST to the outer edges of the full square. There will be about a 1″ gap between the two HSTs. Carefully pin the HSTs to the full square along the cut edge. Please note that where you are sewing the HSTs to the full square will be on the bias. Carefully pin and take your time to avoid stretching. Trim into two blocks using the HSTs raw edge as a guide for a 1/4″ seam allowance. Press seam open.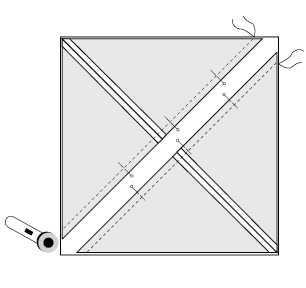
Keep going until you can’t make any more blocks. I had 3 blocks and maybe 4 HSTs leftover from my 10-pack after I finished my layout. Trim blocks to 9″ square aligning diagonal seam lines to ruler markings.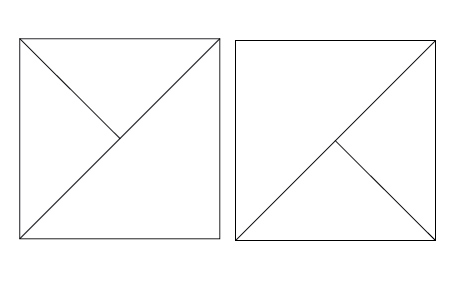
Lay out blocks in 6 rows of 6. Sew the blocks into rows. Press seams open. Sew rows together pressing seams open.
That’s it, your quilt top is finished! Hope this helps a bit for anyone who was curious. Let me know if you have questions, or if I’ve left anything out!
It’s a pretty quick quilt top! Finishes at approximately 51″ square.
I love these blankets- the colors, the shapes, the quilting- all of it! Nice work lady. Wishing I was feeling your inspiration- I’m hitting the knitting needles hard right now as my son wants a knit cable blanket for fall (which I am happy to oblige!) Perhaps I will make this blanket next!!! 🙂 Always fun to visit and see what you are up to!
This is a great quilt. Thanks for sharing the tutorial.
but how did you quilt it??? It doesn’t look like it’s horizontal lines alone…?
Hi Anne! It’s quilted in a spiral square starting from the middle of the quilt, just straight lines. 🙂
Anna
Ok for the tutorial on the piecing but now let’s talk about the quilting. It looks like tiny rows of pebbles?????? Please explain- enquiring minds want to know! Thanks!
Thanks Susan! It’s actually quilted in a spiral square starting from the middle of the quilt, just straight lines. 🙂
Anna
Thanks for this tutorial of your methodology. It looks pretty much like the way I’d planned to do mine. Amazing how such a simple quilt has so much appeal!
Beautiful. Love the colours. Thanks for the tutorial. Going to give this a try.
Hi Anna! Thanks so much for the tutorial! I’m excited to try it!
So sImplement to just skip the second HST of a QST to get these blocks, but I’ve never done it! Love the strong modern look you can achieve 🙂
Question here from a new quilter: Love this design, but would like to make a wall hanging. would this work as well with smaller squares, to produce a smaller quilt? It is very graphic and I love the colors, Having trouble picturing it smaller scale, even with the same sort of tonal fabrics.
Yes, you can do this with any size squares.
I really love your quilt! Looks fairly quick and easy, now I really want to make one. Thanks for the tutorial!!
I love it! I, would sew one full HST to a full 10″ square before I would cut the HST in half, that way you don’t have to worry about pinning or stretching the bias. You would end up with two of the same blocks, unless you want more variety.
Hi Anna, love the look of this quilt. Bought your book recently and I am enjoying that too. Just made the pencil pouch today! Thanks for sharing this tutorial.
Thank you Anna!! I love this design – simple but super interesting, and seems perfect for scrap use too!
you brilliant girl, you! thank you for sharing. i am going to cut up all of fatty’s old work shirts and use this to make him a quilt for his birthday. i have been saving the shirts, just couldn’t come up with a plan – this is perfect!
Wonderful quilt and a wonderful tutorial, thanks so much!
I really like this, Anna! Perfect for a baby quilt and a great way to make the most of 10″ squares. I’ve got a quilt planned with a bunch of Quarter/Half square triangles in it too 🙂
Nice! I have a layer cake I’ve been “waiting” to use, and this is a good stimulus to get on with it!
This is just beautiful!! Thanks for sharing!:)
Great job on the quilt, and the quilting, very inspirational to me !
Love it and plan on making one from my collection of plaids and stripes. And larger than baby size! Looks like it is fun and easy.
Oh, my goodness, this quilt holds such appeal! Thanks heaps for the tutorial and, well, for sharing. You’re the best!
Just the inspiration I needed this morning! hugs!
Thanks. Just purchased Hoffman Hummingbird layer cake batiks. This fits the bill perfectly. Hope you have a successful 2016.
Thanks for sharing have been looking for the perfect pattern for a baby quilt for my cousins grand daughter!