

Materials needed:
- 1/4 yard each of three coordinating fabrics (you’ll definitely have scraps leftover)
- 7″ zipper (you can always purchase a longer zipper and shorten it, just follow the directions on the package
- scraps of medium weight fusible interfacing
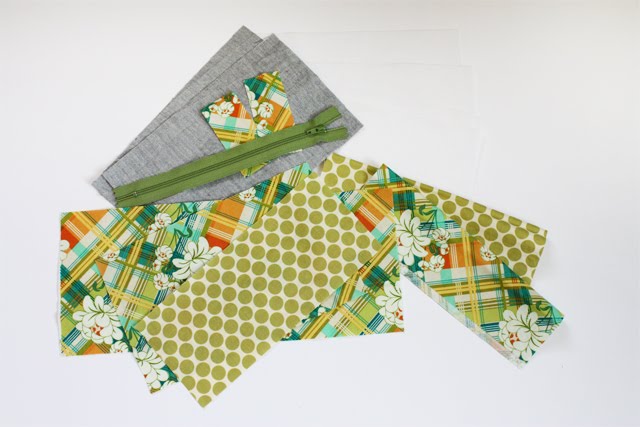
Cutting the pieces:
Main Exterior: cut (1) 5.5″ tall x 9″ wide, and (1) 5.5″ tall x 13″ wide (this will be the gathered front)
Front Band: cut (1) piece 4″ tall x 9″ wide.
Lining: cut (2) pieces 5.5″ tall x 9″ wide
Zipper End Covers: cut (2) 1.5″ tall x 2.5″ wide
Medium weight fusible interfacing for exterior pieces of clutch: cut (2) 5.5″ tall x 9″ wide
Optional:
Divider Pocket: cut (1) piece 8″ tall x 9″ wide (apply interfacing to half, you’ll need at 4″ x 9″ piece)
Card Holders: cut (1) piece 7″ tall x 9″ wide (apply interfacing to half, you’ll need at 3.5″ x 9″ piece)
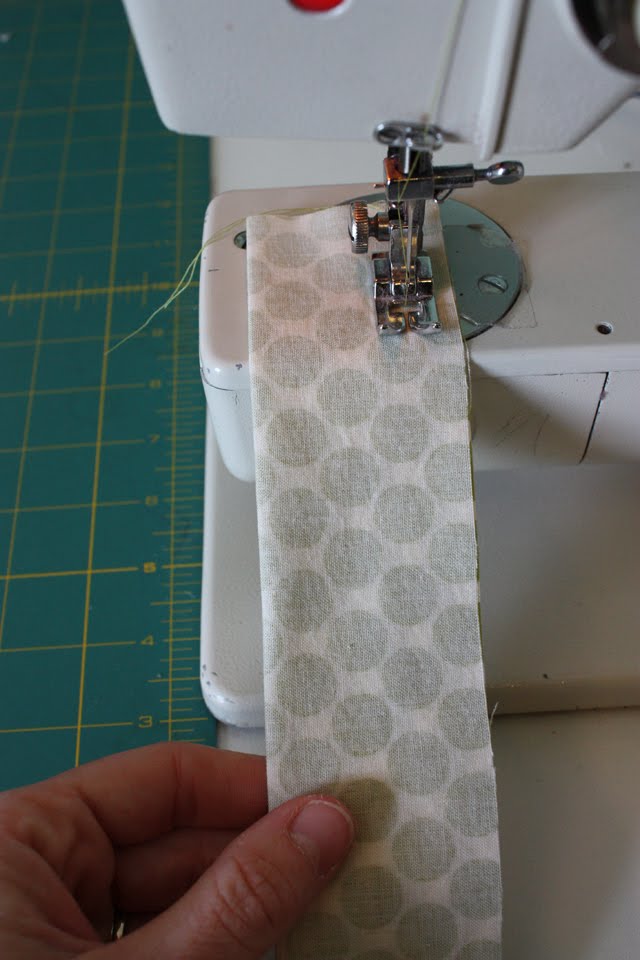
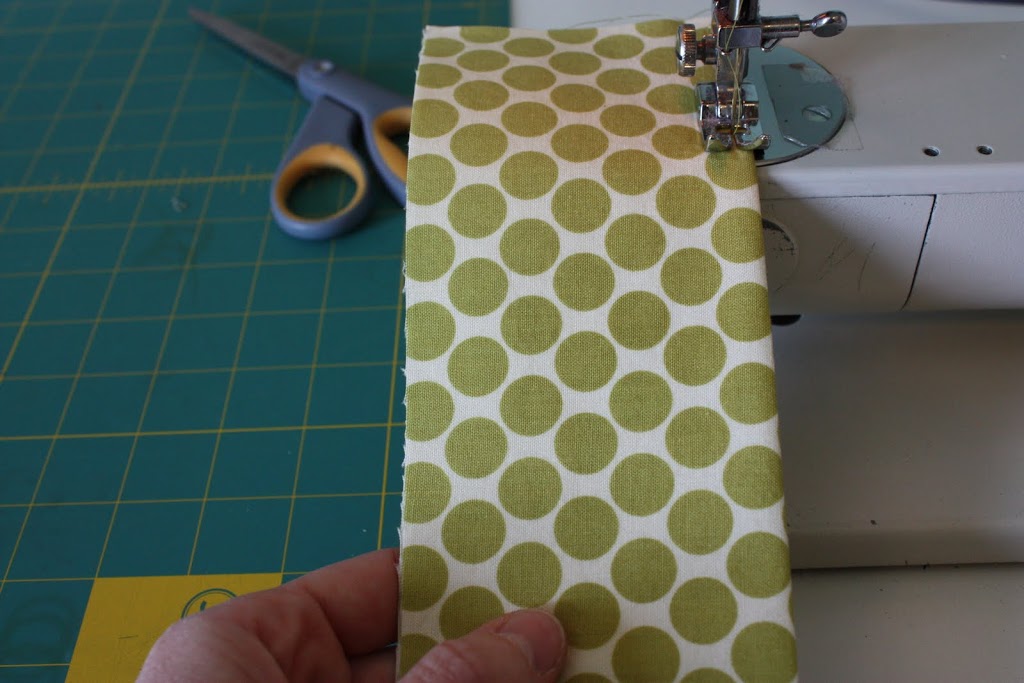
Take the front band piece and fold it in half the long way (right sides together) and sew together using a 1/2″ seam allowance.
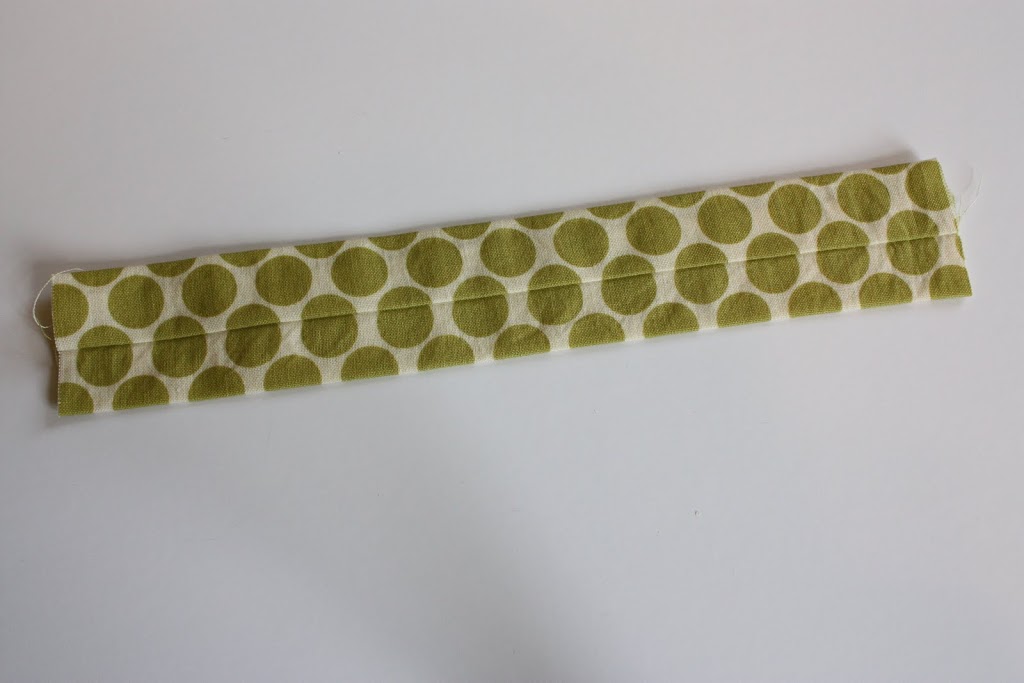
Turn tube right side out and press with seam in the middle. Set aside.
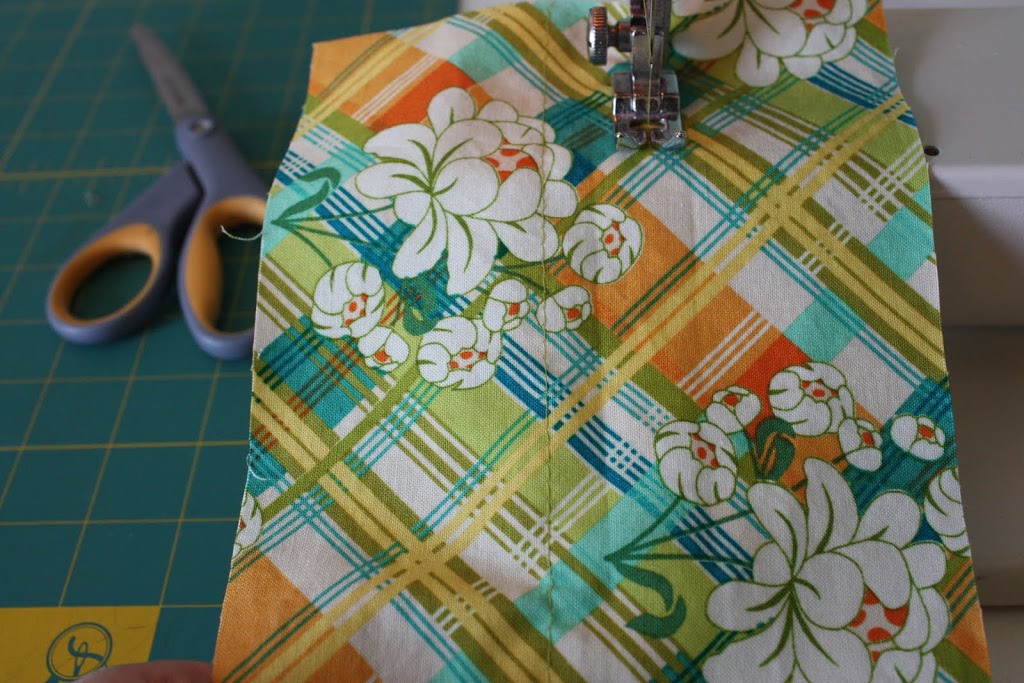
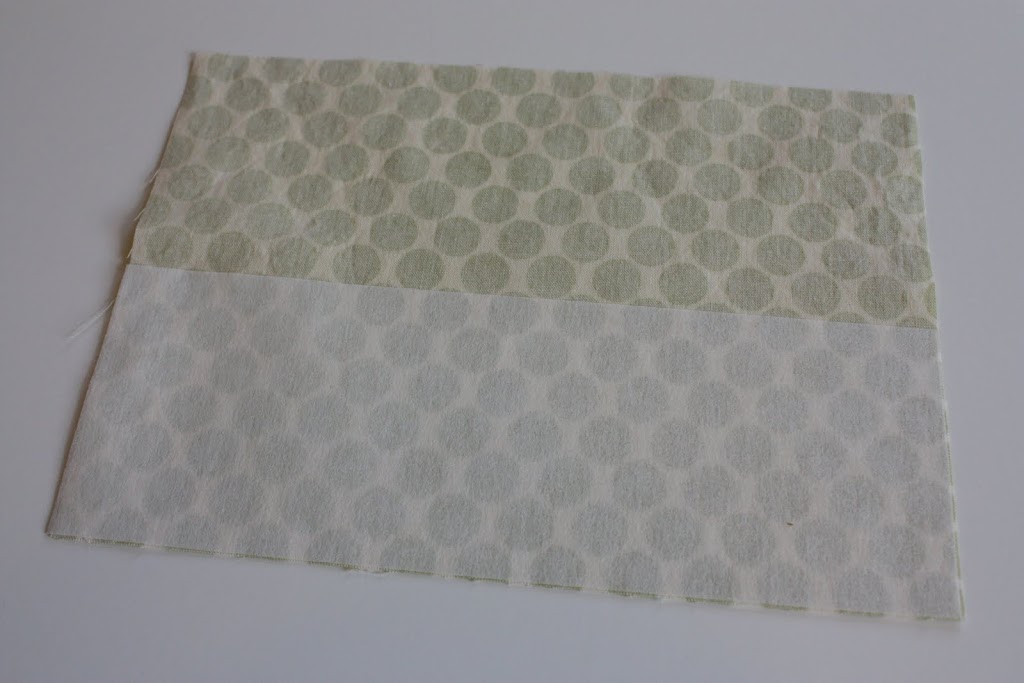
Grab the 13″ wide main exterior piece. Sew two lines of gathering stitches down the middle, about 1″ apart.
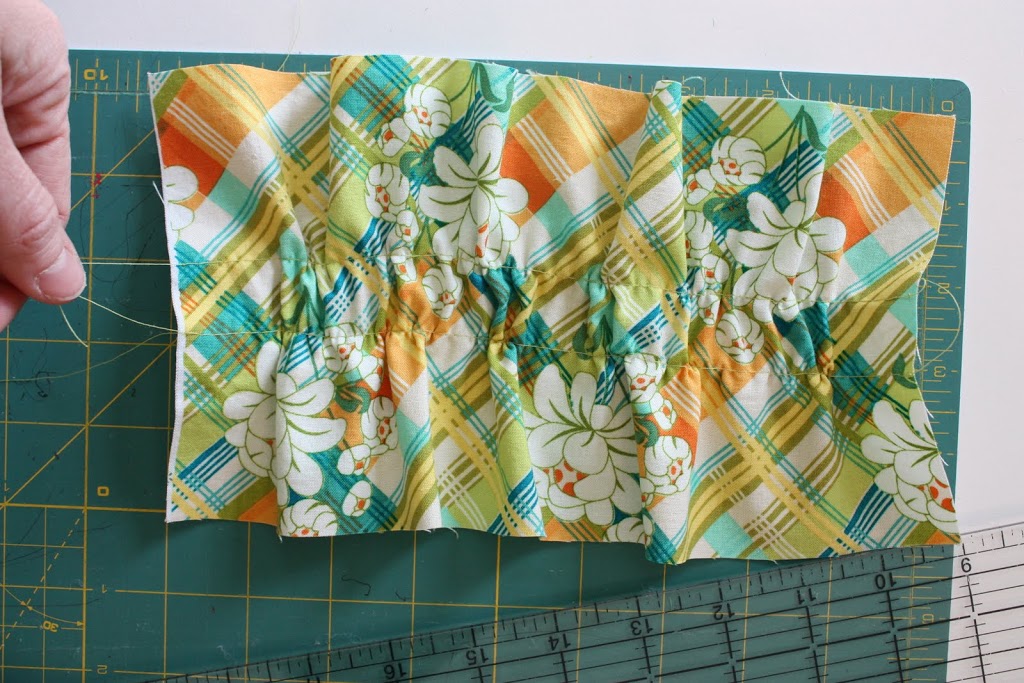
Pull the top threads to gather, pull until the length is 9″ long. Press the gathers in place.
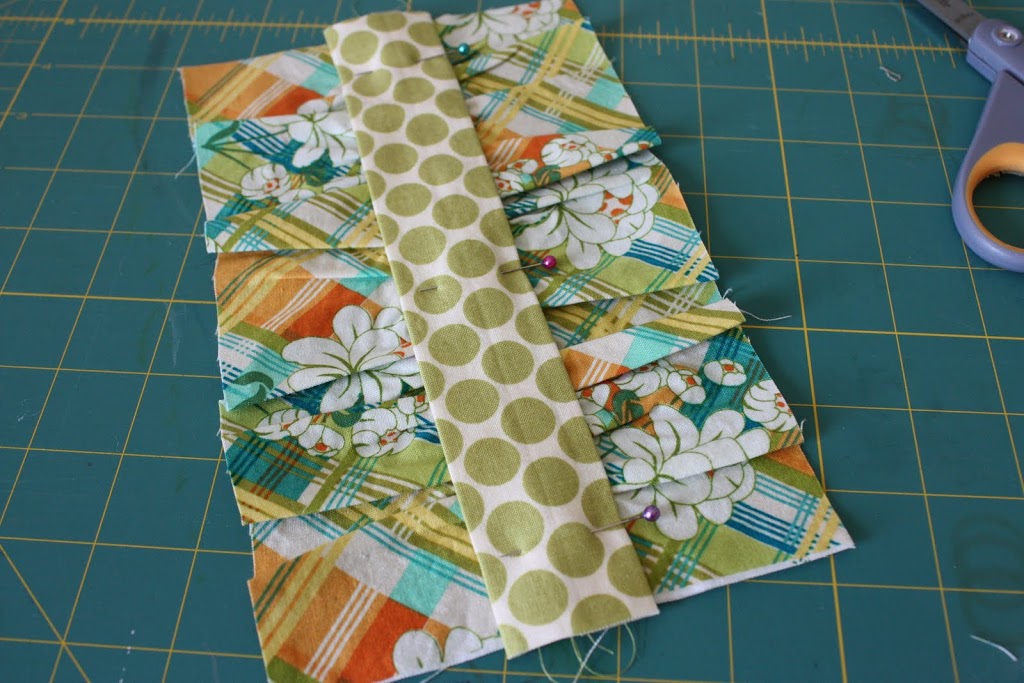
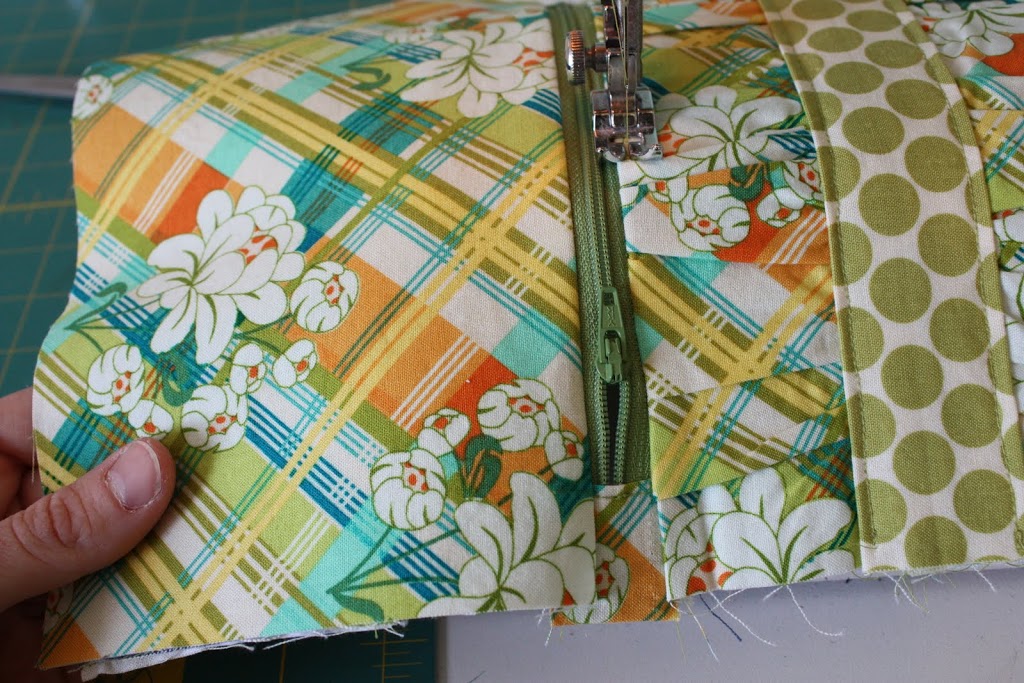
Take the front band and pin it in the middle of the exterior piece you just finished.
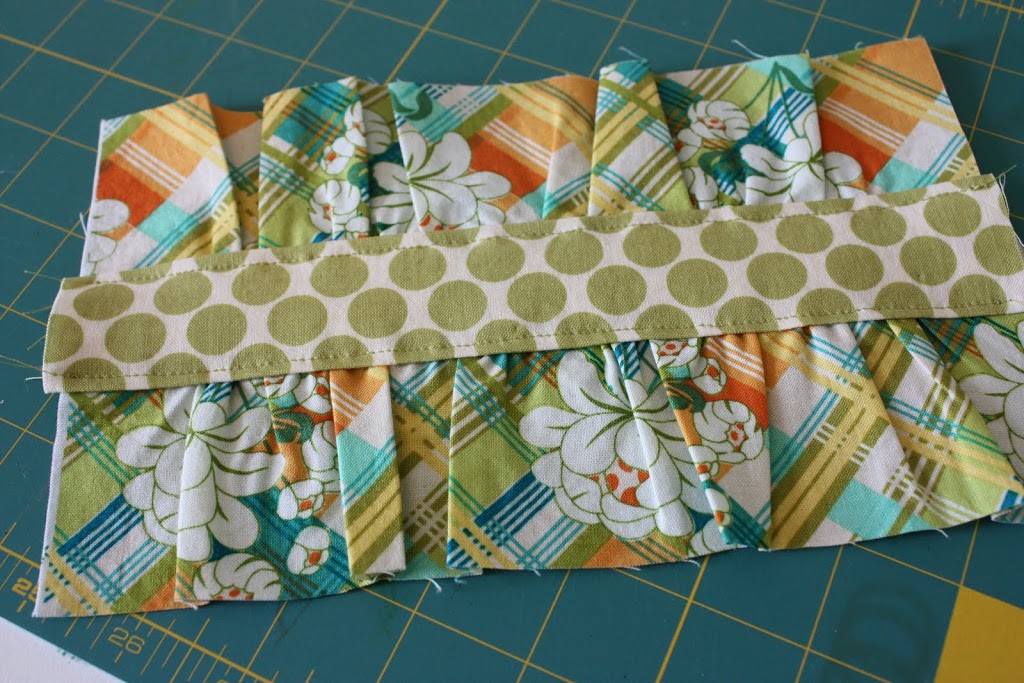
Top stitch along each side of the band. Take the 5.5″ tall by 9″ interfacing piece and iron it to the WRONG side of the gathered piece. This makes all the gathering and stitching stay in place nicely. Set aside.
Make the divider pocket:
Fuse interfacing to half of the piece.
Fold fabric in half with WRONG sides together, press. Topstitch along folded edge and then add another line of topstitching about 1/4″ below the first line of topstitching. Set aside.
Make the card holders:
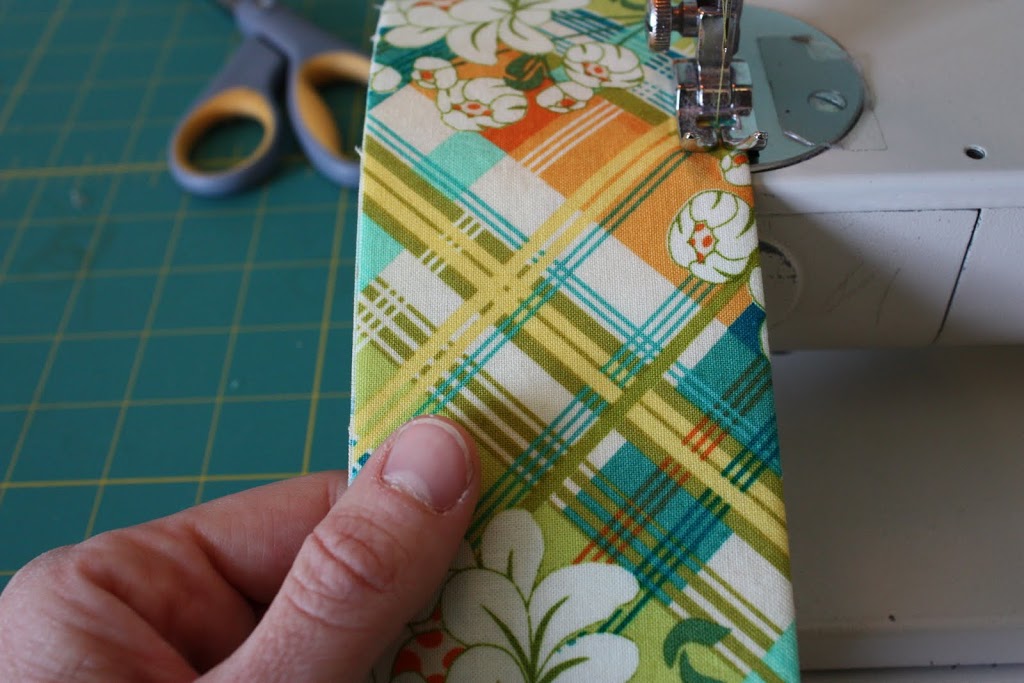
Fuse interfacing to half of the piece. Fold fabric in half with WRONG sides together, press.

Topstitch along folded edge and then add another line of topstitching about 1/8″ below the first line of topstitching.

Take one piece of the lining fabric and line up the card holder with raw edges together, one on top of the other baste along side and bottom edged of card holder (the plaid fabric).

Grab your credit card or driver’s license and mark with a pin how far you want your card to stick up from the slot. Sew a line across the lining/card holder piece where you marked with the pin. Sew one line of stitching down the center of the card holder.
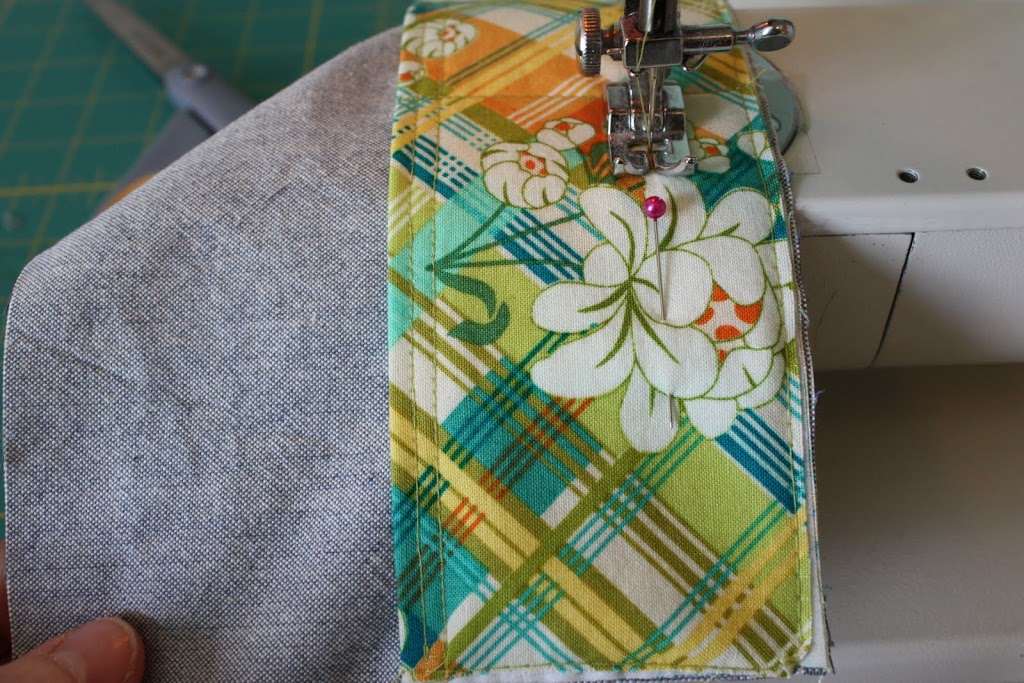
Take your card again and mark with a pin where the edge of your card is (you can leave a little wiggle room, but it’s nice to keep it pretty snug to hold your cards in place). Sew a line for the side of the card, repeat for other side. Now you should have two card holders! Set aside.
Making the end tabs for the zipper:
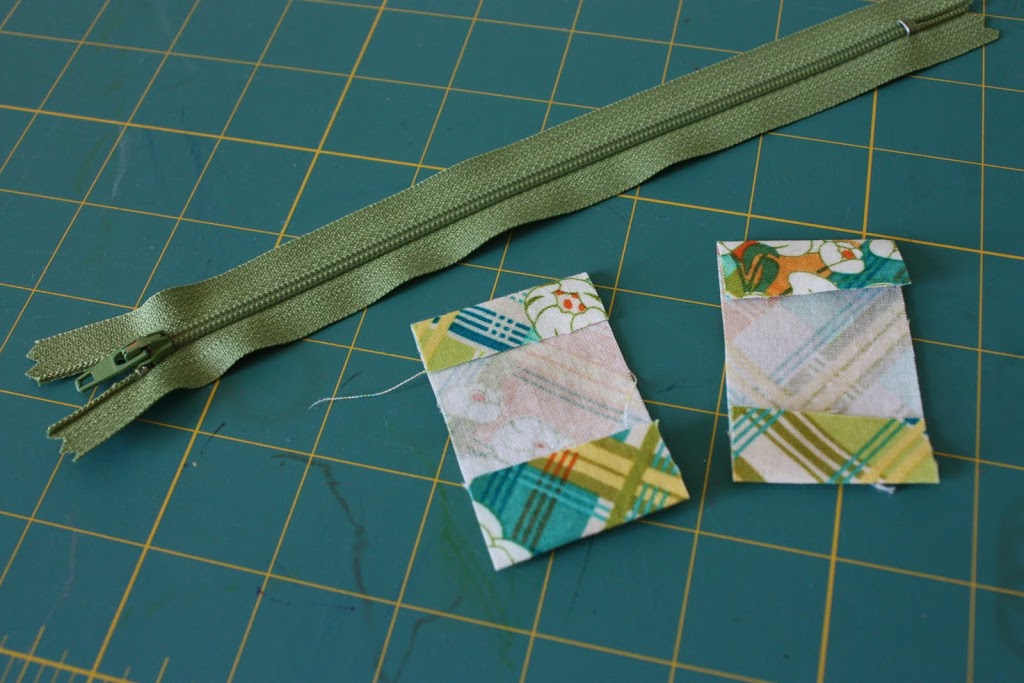
Fold the piece of fabric in half width wise, turn down each raw edge to the center crease and press (the pic above doesn’t show it pressed in far enough). Repeat for other end tab.
Take your zipper and sandwich the end tab around the zipper, just avoiding little metal end stops on both ends.

Topstitch a line straight across the zipper end tab with a very small seam allowance being careful not to hit the metal end stops! Repeat for other end. Trim the fabric tabs to the width of the zipper.
IMPORTANT! The length of the zipper with the tabs on should measure 8.5″ end to end.
Baste the card holders to one piece of lining and the divider pocket to the other piece of lining, aligning the raw edges at the bottom.
Almost done!
Assembling the clutch:
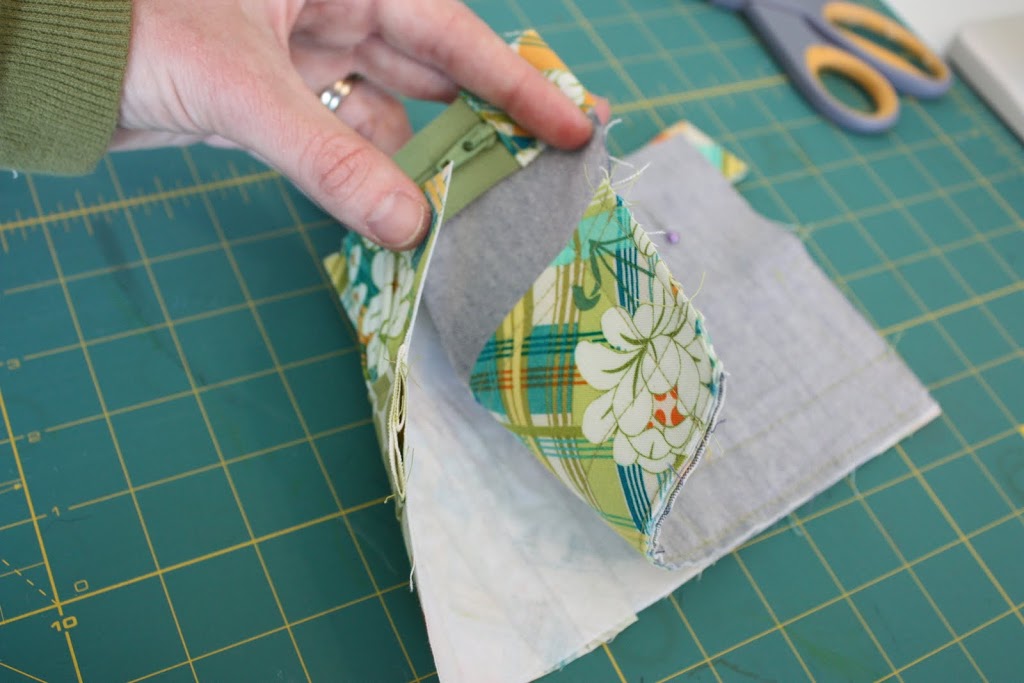
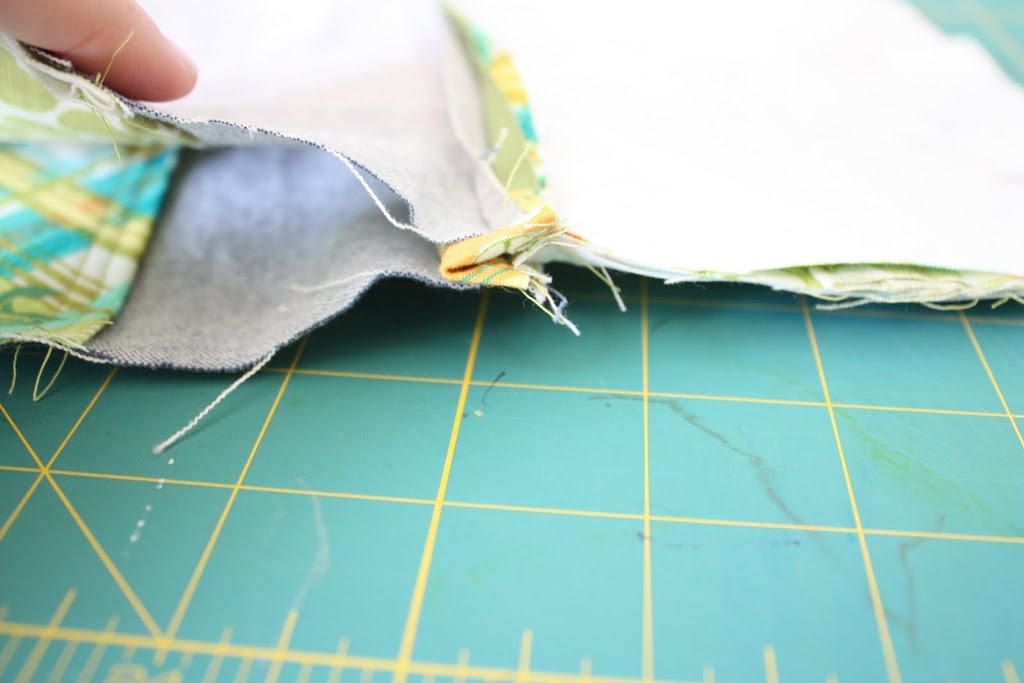
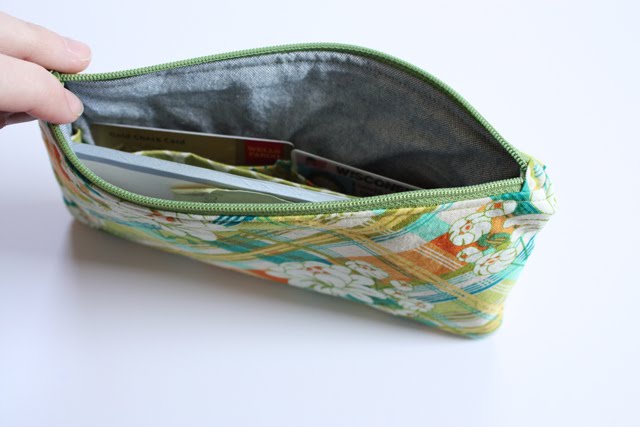
Place your gathered exterior piece RIGHT side up (whoops!, had it wrong in the pic, don’t worry, just get out your seam ripper and start again). Put the zipper teeth side down with the pull tab to the LEFT. Then put the lining piece WRONG side up. Pin in place.
Using your zipper foot sew along the edge of this zipper sandwich. Flip pieces so the WRONG sides are together.
***Please note that in a few of these shots the zipper with end tabs sewn on is longer than the clutch exteriors and linings, it was the first one I made and have since made adjustments to the measurements, all updates are included here in the tutorial.
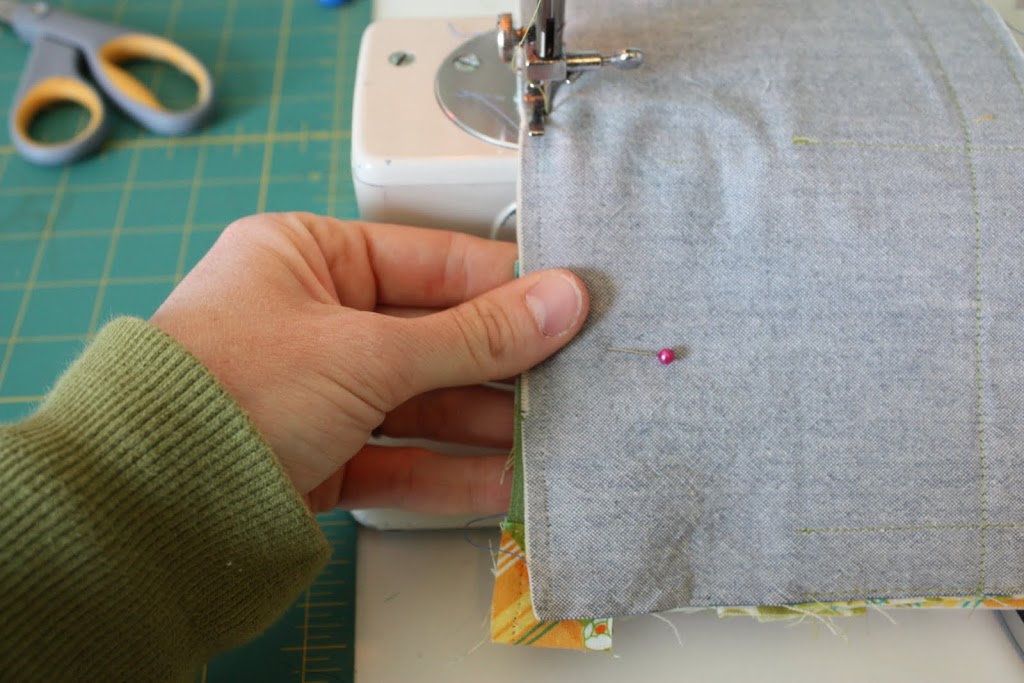
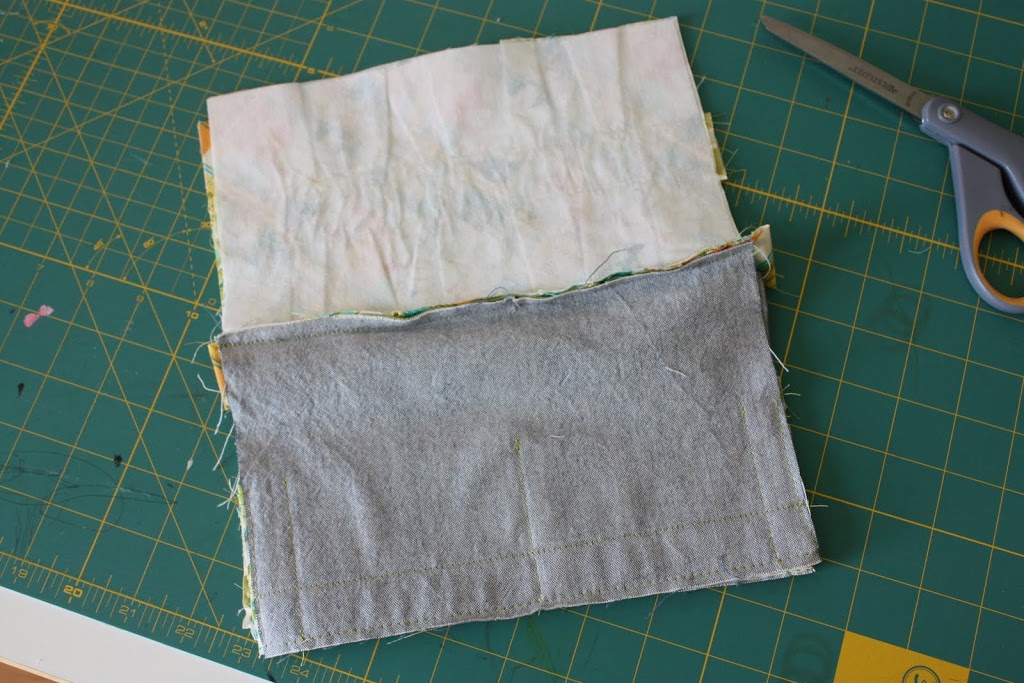
Grab the other exterior piece, place RIGHT side up. Put the zipper teeth side down with the pull tab on the RIGHT this time. Place the remaining lining piece WRONG side up on top of the zipper. Pin in place, sew. Flip pieces so the WRONG side are facing each other. Press!
Put your regular sewing foot back on and sew a line of topstitching on either side of the zipper.
Now open your zipper about halfway, don’t forget this! If you forget to do this, don’t worry, you can still wiggle the zipper open if you carefully pull at it through the fabric.
If you don’t add the divider or card pockets, I would recommend adding a layer of fusible fleece or even canvas as interfacing, it will make the clutch more sturdy.


Anna, I love it so much!! I think I might have to make one…or two…for myself. Your tutorials are great!
This is beautiful! Thank you for the tutorial! & I love that idea of putting end tabs @ the zipper. That would solve many of my (broken needles) problems! thank you! I am trying this tonight!
Thanks for this tutorial! it’s wonderful!
Is a great gift for a mother
regards!
this is so gorgeous…and the possibilities are endless.
Too Cute. Love it. A must on my list. Cant believe I havent come across your blog befour, your so talented. Love it. Thanks for sharing.
Wow, beautiful! On top of my todo list! Thank you very much for the tutorial!
Fantastic! Thanks for sharing your awesomeness! The instructions and pics are super clear, can’t wait to try this…
very cool!
Those are darling! I don’t know if I can sew good enough to make one, I’ve never put a zipper in before. I may print your instructions and try it though! Thanks for the awesome tutorial! Happy Spring!
THANKS for the tutorial! I’m totally going to make one of these (at least!)!
Oh how lovely! Bookmarking for later. Thanks so much for sharing such a great how to!
Thank you for this tutorial. These clutches are so beautiful! May I post about this tutorial in my blog?
So cute Anna!!! Thank-you for the great tutorial! I neeeeeeeeeed to make one of these!
WOW!! ADORABLE!!! Excellent tutorial! Can’t wait to try it out!
Another great “hit”, Anna. I love the look with the gathers. I’ll have to bookmark this one, too!
Wonderful tutorial and so well explained, too! Thanks for going to all the trouble!
Oh boy, this is definitely my favorite tute of yours so far! I love this design! It’s definitely going on my “to-do” list 🙂
Oh my! This is SOO cute! Thank you so much for making this a tutorial for us! I can’t wait to make one (or ten!)
Adorable! Can’t wait to try it!
Oh I am in looove! I need something to stick in my purse to hold stamps and stuff like that, and this would be PERFECT to keep them same with!
Another cute clutch! This makes 2 days in a row that I’ve had to add adorable clutches to my “I Must Make This” List.
I love the pleats and texture in this one. So wonderful.
So completely adorable!! I’ve moved into a new purse and need a new wallet — this is definitely on my list! :o)
Incredible project and one of the best, most detailed tutes I’ve seen. Although not an easy project, the way you break it down should help even beginner sewers succeed! Thanks for a great tutorial. I’ll be linking on Facebook.
Thank you so much for this tutorial! The clutches are beautiful! I think I found my Mother’s Day gift for all my wonderful friends! I’ll be posting your DIY on my blog 🙂
prettiest clutch i’ve ever seen. it is rainy and stormy here today. looks like i’ll be making a clutch! thank you for another wonderful tutorial.
Oh my, how cute! My hubs and I are going on vacation this weekend and this would be so much fun to take with in my carry on and for a few date nights! 🙂 I am so making one of these during nap time this afternoon!! 🙂 Thanks for the great tutorial!!!
I love it! So pretty! Will definitely make one soon. Will post link to my blog. Thanks!
Ooh Wow! I love this. Want to sew one immediately. Thanks for your tutorial
This is such a great tutorial. You are pretty good at showing exactly what to do, so thanks a bunch for that! Can you tell me the name of the fabric you used?… The plaid w/ flowers is really adorable!
Hi, I came here from Made. And now I’m hooked! 🙂 Thanks for the tutorial. I know what my friends and my mom are getting for Mother’s day!
This is so pretty! I love how you gathered the pouch! I never would have thought of that !!
I’m totally making one of these!
Oh wow! You outdid yourself. . .those are fantastic!
Great tutorial and lovely project. Thanks for sharing!
I am a new sewer and this was such a great tutorial. The step by step photos. So inspired Anna. Thank you.
I love this! Brilliant. I’m going to give it a try. The pockets make it stellar & the gathers are lovely.
i cannot tell you how much i <3 you right now. i bought two 1/4-yard remnants of a print i love and until now, had no idea what to do with them.
thank you so much!
I am gonna make one of these for my mother, who has everything, I know she doesn’t have this.
thank you for the tutorial.
I love this Anna! So cute and feminine! Great job. (Must make some this weekend.)
I love this! I’m going to make one for my aunt who has had a rough year since she is town! This will be fun.
Clever!! I love it!
Jana
Anna! Those are great! I really love them. Thanks for the great tutorial!!!
So cute! Would it be poor form to make one for myself for Mother’s Day?
I think those are the cutest clutches I’ve ever seen, for real! I love the pressed gathers in the middle. You are so smart!
Wow Anna – These are so cool. I had bought some zippers to try your other purse pouches so will definately have this one on my list too. Thanks
Thanks, I love this! I just made two small zippered pouches this weekend but I love the variation of the gathers.
This is soooooooooooo super cute!!!!
Thanks!! I hope I can sew this weekend!
Great tutorial Anna! I’ll be making a few of these!
This is wonderful. I love the clutch and can’t wait to make one (or a dozen). Your instructions are very well-written. Thanks so much for sharing your creativity!
Excellent pictures to show what to do with each step! Thank you! Good gift idea!
oh I LOOOVE this! such a great idea to make a simple project so totally rockin’ !
Laci
http://zigzagsthisandthats.blogspot.com/
super cute!
awesome! thanks anna!
Beautiful idea Anna! How you find time to create such beautiful things is beyond me. And how kind to share your process with the rest of us! I know what I’m making my sister for her birthday May 3! 🙂
I love your pattern. Thank you.
SOOOOO cute! I love it for moms, but also for teacher thank yous!
Thanks YOU!
This tutorial is so well done! If I have the time, I’m going to make one for my mom! And maybe me too.
Thank you everyone for such sweet comments, it really keeps me going! I wish more of you had your email in your blogger profile so I could say thank ‘in person’. 🙂
These are really wonderful. And I am totally wishing I had seen this tutorial before I ventured out on a zipper tutorial of my own the other day. Haha. You have such great ideas! Thanks so much for sharing! 🙂
Your pics really make it so easy to follow your tutorial. great stuff and soooo cute.
FANTASTIC tutorial!! Thank you so much!
Oh! It’s so CUTE!! Can I link your tut on my blog?
thanks
Eleonora
Thank you for sharing this amazing tutorial! I love clutches, and I think these will be great for making as gifts.
🙂 Deb
Thank you so much for posting this wonderfull tutorial! Ciao, ti mando un caro saluto dall’Italia! pia
LOVE this, and will be making some!
Adorable! I’ll definitely be making these soon. The little gathers are perfect.
etsy.com/shop/sewlopatterns
I love this and will definitely be making some soon! Thanks for the tutorial.
A very classy looking clutch. I will definitely be making several of these. I’m sure my daughter will love them!
I have a silly question. In the supplies section, do you mean a total of 1/4 yard of all three fabrics or 1/4 of fabric total? Thanks! This is the perfect Mother’s Day gift for my sister and MIL
email: anna.onofrio@gmail.com
I just might have to kiss you. I’ve been watching MADE for a great mother’s day idea and THIS WAS IT! I just finished making the first one, and it actually turned out. (I’ve never done anything close to a zipper before…. SO nervous.) Your tutorial made is perfectly understandable. I’m amazed I did this! Thank you SO much!
Fantastic tutorial, I love the wee clutch and you make the zipper look easy… I have featured this tutorial on the Freebies for Crafters blog.
Thanks for the tutorial! I might be making one for me and my friend, tomorrow. I love it!
Adin B
http://itssewtasticmama.blogspot.com/
it was a love from the first sight, I had to make one of these. I learn from you a lot, especially, to cover the zipper ends, it looks much better, thanks again, and keep making your wonderful crafts
Shir
Muchísimas gracias por el tutorial, besos
Chelo
aww great tutorial, its really lovely..tfs
wow these look beautiful. I dont have a sewing machine but I may attempt one by hand.
Qué lindo proyecto , me encantó !!!!!!!!!muchas gracias por compartirlo, el tutorial es impecable!
What a great tutorial! That looks so easy, even I could probably make one (and finish it!) I think I’ll try making one for my sister, I have the perfect fabric too. Thanks for making and posting this! I’m a new follower now. Oh and I LOVE your name!
Anna
Lovely tutorial! I would like to translate it to swedish and hand it out to my high school students as an idea, with your permission of course!
Hi Anna! Thank you once again for an easy tutorial and I made one for myself today. I posted it on my blog. 🙂
Adin B
http://itssewtasticmama.blogspot.com/
OMG These are truly amazing, I’m a novice at this kind of stuff, but I’m gonna try, try, tryyyyyy! I hope I can pull it off. Thanks for a great tutorial! 🙂
What a great tutorial and clutch! I bookmarked it and and shared it on Reader but completely forgot to come and thank you personally! 🙂 Can’t wait to make one of my own.
Mayya, from Sew Chic and Unique has featured this tutorial in her “vote to sew it” this week. I will be doing one for my Mother, who now we take just her CC and ID with us to the DR office. I think she will feel like she has her purse along. I have just the fabric for it as I buy many fat quarters for quilts and projects. Thanks to you and Mayya for bringing us together. Carylanne http://sewchicandunique.com/2010/04/get-ready-set-vote/
OMG, This tutorial is perfect in everyway. Thank you for taking the time to make and post it.
I don’t know how I missed this one. I love the gathered front. I definitely want to try it. I hope I have an 8″ zipper around.
I’m an official noodlehead now – I made my first bag today, and posted a picture to my blog, linking back to you 🙂 Thanks for the inspiration and tutorial – I’ll be making more of these – they’re quick, easy and best of all – pretty!
This is SO cute! Thanks so much for sharing! I posted a link to your blog on my craft forum!
– Elizabeth (missimagination.com)
made 2 of these over the weekend. thanks so much for the tute. my only issue was the little zipper tabs never turned out looking as nice as yours, but overall, such a great and easy project.
these clutches look very pretty! i love them.
i made one by myself. (ok, just similar)
thanks for the tutorial!!
many greetings, doro.
Hi! Thank you so much for the tutorial. I hope someday i’ll get the courage to try and make something so beautiful. Greatings from Portugal, Raquel
Just made my first one. GREAT pattern, I love the gathered front, so easy to follow! thanks!!!
these are GORGEOUS!!! can’t wait to get my mom’s 70’s sewing machine oiled up and working. these are at the top of my project list!
wonderful! i just finished one for my little sister and im about to start the next one for myself and one for mum too! thankyou for your tutorial, its so easy to understand and the pictures really help!
after this im going to try your other purse tutorial too! xxx
Cara senhora,
muitissimo obrigada pelas explicações e pelo trabalho maravilhoso!!!
abraços de Maria Filomena
I lovely!! Thanks!! Anne
These are adorable and look easy to make. As soon as I get into my new house and get the machine unpacked I will be making one for me and my mom. Thanks for sharing.
Muito linda,,,obrigada pela dica,,,,,
thanks!!!!
sandra mayer-Brazil
I have this on my Crafty To Do List and can’t wait to try it! I have a few questions – when do you attach the polka dot divider pocket and also do you have a photo of what the clutch looks like on the inside with the divider pocket and card holders? Thanks!
Ok, I did it. Took me all day but it’s done. Couple questions. I did’nt see 8″ zipper at the fabric store, so used a 9″. I did’nt get it set in right. The tabs at the end do not show and there is a slight curve to the zipper ends. Can you explain how to measure the zipper? Can’t wait to make more!!! Thank you, love your blog
Sonhei com isso, com uma necessaire franzida e encontrei esse pap maravilhoso.
Obrigada!!
Beijos
Vânia G
Joinville-SC Brasil
I dreamed of this, with a furrowed necessaire pap and found this wonderful.
Thank you!
Kisses
Vania G
Joinville-SC Brazil
Thanks so much for the tutorial. I can’t wait to make one!
Okay, I just finished one this morning and it turned out great. The only thing I had a hard time with were getting the zipper pull tabs to look right in the end, (this was my first zipper)but I think I got it. I love this and am making another one tomorrow. I’ll post some pics on my blog after mother’s day since they’re gifts for my sis and MIL. I’ll email you one if I can figure out how. Anyway-thanks again for your post and your help. 🙂
Hi:D Thank you for the tutorial 😀 I made one for my Mom for Mother’s Day (just in the mail, but I’m pretty sure she’s gonna love it!)I didn’t add the zipper tabs (in hindsight, I really, really should have) and I added a handle. You can see it here: http://toughiesews.blogspot.com/2010/05/i-am-jobe.html
Thanks again, you do some lovely work. 😀
Trudy
Okay, where did you get your fabulously colorful zippers? All I can find are the classic colors (white, beige, black). Thanks for the tutorial! I am making one for mom and me.
Yay! I made one. I hope to make many, many more for gifts!!! You are awesome Anna, thanks.
Thanks for the tutorial! I made one for my Mom for Mother’s Day…just finished!
Thanks for the tutorial. I love this project & may be addicted. You can see my pics here: http://oneprojectaday.blogspot.com/2010/05/gathered-clutch.html.
This comment has been removed by the author.
Super cute!! Thanks for the tip on covering the zipper ends. I have never done that before. Super great!! And for fusing the interfacing to the already ruched piece. Super helpful! I hope to make one of these semi-soon!
Found you from Creation Corner…ADORABLE work, and thanks for the tutorial!
Thanks for sharing, Anna – what a cute and easy project to either spruce up one’s personal accessory stash, or to give as a gift!
(mine started out as a gift but I think I’ll keep it!)
Blogged at roseleej.blogspot.com
This tutorial is great! I already made one and your instructions are easy to follow. Thank you so much for sharing! Greetings from Germany.
I love these clutches. I am having the same problems with the zipper as some other people. I tried to cut down a 9″ zipper to 8″. It worked a little better, but still was not as nice as yours. Could I use a 7″ zipper and make the tabs a little longer. Also do you have any tips for making the fabric straight after you pulled the ruffles. I love you blog and enjoy all of your tutorials.
Hey Christa! Glad you like the clutches. Yes! You sure could use a 7″ zipper and make the tabs longer. Or you could extend the sizes of the exterior and lining (and inside pieces) all to be 9.5 inches. I didn’t leave a lot of wiggle room for error. The main thing is when you sew the clutch together after the zip is installed is to try and NOT sew over the tabs, just go right next to them. It’ll make it turn out much better.
Awesome tutorial! I didn’t know if you had a flickr group set up for all the version people make from this, but here is mine in case you care to see!
http://www.flickr.com/photos/somethingcheeky/4609888262/in/photostream/
That is seriously adorable! I can’t wait to make this for all of our membership passes! I have filed this at thecraftersfilebox.com.
Thanks for sharing!
Very cute, thanks for the tute.
Hi, I’m smitten with this little project and just bought some cute fabric today with this in mind. After reading through your instructions, I’m a little confused about the divider pocket. Is the divider pocket also called the credit card pocket? I didn’t see a divider in your photos and don’t want to miss out on an important design feature.
this is amazing!
I did it!! I saw two of them, one for my mom and other for my mother-in-law.
Easy and gorgeous! You were right, I spent more time cutting than sewing it.
Thanks very much!
I totally adore these purses! If you don’t mind, I made a link to this tutorial on my website http://www.kloske.nl
I sooooo agree Anna! I’m trying to pick out fabrics right now and it’s definitely taking a lot of time!
I made one, and in making it, I realized that I could also use the back’s layout to make a pencil roll for my mom! I posted about it here: http://craftdiscovery.blogspot.com/2010/05/tutorial-gathered-pencil-roll.html
Thanks for inspiring me!
Thank you for sharing this wonderful tutorial! I made a few for teacher gifts this year and posted pictures on my blog.
Emily
saltwaterkids@gmail.com
Love your blog and the name of it!! Not to mention the drawing!! That’s about all I can draw .. stick men!! Great tutorials :))))
Thank you for this great tutorial. I made a clutch yesterday, and it turned out really nice. The only thing I changed was to sew the lining a little smaller than the outside. Now it fits better into the clutch.
If you like, you can have a look at it on my blog. I linked to you tutorial.
http://butzelmaennchen.blogspot.com/2010/05/geruscht-und-gerollt.html
And you know what: I just found out that your daughters are your noodleheads. Can you guess who are my Butzelmännchen?
Thanks for posting your tutorial. I bookmarked it for weeks now and finally had the chance to make one yesterday. The instructions were easy to follow. I’ve linked this post on my blog:
http://rabbitandpiggie.blogspot.com/2010/05/gathered-clutch.html
I adore this clutch! It’s so cute! Thank you very much for sharing this tutorial – I can’t wait to try it out!
ok…just made it and i think the tutorial was awesome, except one little thing…(that’s probably obvious to people with more sewing/zipper experience than me!)…
when you said push the zipper tabs to the liner side, i tried to make mine look like yours but it just made mine look pinched on top…not like yours?…
are my zipper tabs too small?
thanks! – it’s still cute even with the pinched top!
Lovely!
I have a question that I have been asking around: How do you feel about people swapping items made from your free patterns/tutorials? Example, I swap a lot on Craftster. Would you mind if I made something from your tutorial to swap for something for myself? (Of course you would always be given credit as the designer of the pattern.)
Thanks!
Thanks for this! I made mine with linen and Hunky Dory, and I love it. I will blog about it and link it back here 🙂
http://www.ocd-obsessivecraftingdisorder.blogspot.com
süper olmuş eline sağlık .
Thank you so much!
It’s a wonderful tutorial.
erin~ email me and I can give you a more specific answer, but you just want to make sure the zip (with the tabs on) measures about 8.5″ and then do not sew through them when you go to sew up the exterior/lining…
Muchas gracias por compartir con nosotras tus ideas de costura.
♥♥♥♥♥
http://mireyacouture.canalblog.com/
thank you, that is a wonderful tut. The gathered front is perfect!
girl this is great: i am looking for a pattern to do my first zip on!
xxthankyoU!
What a lovely little bag! Thanks so much for sharing. Definitely going to make several.
…now to figure out what fabric to use:-)
I’m s making this one! Thankyou!!!
Thank you for the great tutorial. I have linked it at the new online sewing community: mysewingcircle.com
I just made my first one. It took me longer because I kept making small mistakes; but I got through it. It should be easier with the next one. This is a fun, cute project, with mega “ooh-ahh” factor! Thanks so much!
Wow- I just made one of these last night (it’s perfect for me because I bearly wear a purse- usually just a diaper bag with a wallet in it- and this one can work either way!) and I love it! I’ve already gotten compliments on it this morning! (I blogged about it here: http://theabsoluteluckiest.blogspot.com/2010/06/i-spoke-too-soon.html)
The one part I had a problem with was sewing the lining shut at the end- it says “stitch closed using a small seam allowance”. Do you basically topstitch it? Use a hidden stitch? I did a little zig-zag stitch (because really, who’s gonna see?) and it lays flat, but there’s got to be a prettier way! Thanks!
I’ve just found what I’m making for this year’s family Dirty Santa gifts. These are going to be great. I wonder what else I’ll find in your tutorials. You give great directions!
Hi,
Thanks so much for the great tutorial!
I just started sewing, and I found this challenging, but I did it, LOL.
Take care,
Kat
Wow! This tutorial made me so happy. Can’t wait to try it!!
Hi, I love this tutorial, thank you 🙂
I can not wait to make it 🙂
I made one of these tonight for a teacher gift, and I love it! I have two others cut out and ready to go, so I’m looking forward to making a couple more soon, especially now that I’ve tackled one. The trickiest part, for me, was sewing around the whole thing, around those zipper tabs. Next time, though, I’ll have a better idea of what to do. Thank you for the tutorial!
Thanks so much for the tutorial. I made one tonight as a gift for a friend, and I know she is going to LOVE it! Thanks again!
I love this style and appreciate your willingness to share your pattern and expertise. Thanks so much.
these are so cute and I like the idea of the small amount of fabric on the ends of the zipper…I keep making mine too small and have to sew over the zipper…great idea…
These rock!! I want to make one for when we go on vacation later this summer. I’m thinking that maybe I can add a wrist strap to one end so I can hang on to it better. Thanks for the tutorial! I read through it and I think I can do it. Not sure about a couple of points but I have a feeling that I’ll figure it out when I actually see it going together. : )
Thanks for the great tutorial. I loved making this little purse and hope to make some more for Christmas presents (if I can part with them!).
Thanks for this tutorial Anna! I enjoyed making the clutch a lot 😉
See finished product:
http://www.facebook.com/photo.php?pid=4700479&l=9c06056222&id=714046905
Darling bag… but, I dont’t understand this instruction: “Make sure you try to sew around the zipper end tabs and not actually throught them.”
I’m just not getting that neat boxed look at the end of the zippers.
ski1402@verizon.net
GORGEOUS!! X
This is really lovely. I don’t understand the measuring with inches, but I guess I’ll find out how to turn it into centimeter. Thank you so much for shearing 🙂
i just copied (and gave you credit) this! see how it turned out! http://thethriftyba.blogspot.com/2010/06/if-your-name-is-brittany-and-today-is.html
i made my own and gave you credit… thanks for the tutorial.
Rocio
I just made my first one tonight… Thank you for making it SEW easy! I have never even attempted a zipper before! I am not posting mine till Sat. but I’ll come back and leave a link when I do 🙂 I will be cranking these out for Christmas gifts now!!
I just made my first one tonight… Thank you for making it SEW easy! I have never even attempted a zipper before! I am not posting mine till Sat. but I’ll come back and leave a link when I do 🙂 I will be cranking these out for Christmas gifts now!!
I just made my first one tonight… Thank you for making it SEW easy! I have never even attempted a zipper before! I am not posting mine till Sat. but I’ll come back and leave a link when I do 🙂 I will be cranking these out for Christmas gifts now!!
I just made my first one tonight… Thank you for making it SEW easy! I have never even attempted a zipper before! I am not posting mine till Sat. but I’ll come back and leave a link when I do 🙂 I will be cranking these out for Christmas gifts now!!
As fotos do passo a passo(PAP) são auto explicativas. Parabéns! Obrigada! Thank you brodher! Deus lhe abençoe, proteja e ilumine sempre a sua vida em todos os momentos!
Como não sei traduzir as explicações prá portugues, entendo muito bem com a sequência das fotos.Abraços e beijos.
Marize Trigueiro/Maceió-ALAGOAS/BRASIL.
I just got done making this and i love it!! Def going to make alot more!! Thank you!
I just made mine this afternoon. I machine embroidered the little strip on the front panel and I’m very pleased with the result!
Great tutorial! I love the design. I might have to make some of these for my sisters, mom and myself! 😉
mommyoftwo247.blogspot.com
I love this clutch! It’s so adorable – I can’t wait to make my own! Posted a link on my blog: http://ificould-ificould.blogspot.com/2010/07/gathered-clutch.html
Thanks for sharing!
-Missy
I Love these!
Thanks for sharing!
-Crystal
Absolutely lovely! I blogged about it and linked to your blog.
Alexandra Alcantara
juricaqro@gmail.com
http://panenka.squarespace.com (this is my blog in English)
Thank you for the tutorial I finally got to make it!! http://simplyjessarmywife-jessicapercifull.blogspot.com/2010/07/gathered-clutch.html
Anna, will you please tell me the name of the fabric you used for your tutorial clutch? I’m salivating over it and would love to find some of my own. Thanks so much!! writetoleslie at gmail dot com
I have a question for you 🙂 I recently made one of these clutches, and had a problem when sewing around the outer and inner layers. When you say “Make sure you try to sew right next to the zipper end tabs and not actually throught them,” I’m not entirely sure what you mean. How do you sew next to them and not through them, when (like in your picture) they stick out beyond the actual sides?? I just can’t get my zipper top to look anywhere near as nice or square as yours, and would love to know what you mean by that.
Thanks!!
Hey Kristin~
Basically I guess it’s a case of do as I say not as I do. 🙂 The photos are taken with one of the first ones I had sewn, and afterwards I made a few slight adjustments. Just follow what the directions say and the most important part is to make sure the zipper with the end tabs sewn on is no longer than 8.5″ long (thus allowing room for a 1/4″ seam allowance on each side, and allowing you to sew right next to the tabs). Hope that helps!
Anna,
Thanks for the quick response. 🙂 I kind of figured that because when I made mine, they didn’t stick out like your picture. However, when I did sew just right next to them instead of through them, I could see a hole between the bag and the zipper tabs, so I had to go and turn it inside out again and try again. Any suggestions? 🙁
no problem K, how about you shoot me an email? graham.anna@gmail.com
🙂
I just made my first one and am thinking about modifying the gathering into pleats. I absolutely love this clutch and was happy to find that it fits all of my cosmetics! Thanks for putting such a great tutorial together.
Just put one of these babies together today. It was fun and I love how the possibilities are endless. Thank you so much for the tutorial. I might have to make one for each day of the week!
Thank you so much for this great tute!! I started one last night, but was tired and kept making mistakes. 😛 I was able to fix everything today and am very pleased. I am happy to have found a pattern that I can use to make this year’s round of holiday gifts! 🙂 Thanks again!!
I made this clutch Sunday night and love it! Your directions were so easy to follow. Thanks for posting the tutorial!
Aaaaaaaaaaaaaahhh it’s so beautiful!!!!
I want it!! ^^
icicestout.blogspot.com
I just found this!! I will definitely be making some as Christmas gifts this year!!!
I love this! One of my readers gave me a tip to try your tutorial – I loved making them. I need a bit of practice, but I enjoyed the challenge 😉
http://amijustmom.blogspot.com/2010/08/gathered-clutch.html
I used this super tutorial, and you can see it here: http://www.burdastyle.com/projects/hear-me-roar-cell-phones-clutch.
Thank you so much!
Thanks for the great tutorial. These are super cute! I’ll definitely be making one or two of these!
I made one tonight, and wish I had read the comments beforehand! It turned out beautiful except for, like many others, the tabs on mine look pinched rather than square. After reading everyone’s comments I think figured out the problem and am anxious to try again. I may even add a small belt buckle to my band across the middle! So many possibilities! Have you made any that are larger? I was wondering if there were any tricks to keeping them stable.
hey lacey, yes, I did make updates to the post reflecting other people’s comments. Fusible fleece and/or canvas would make a great interfacing for a larger version. 🙂
These are adorable! Thanks so much for sharing your version! I had seen a simple youtube video about a change purse and styles on etsy for inspiration and the first day I had my new sewing machine I stitched up 6 of these adorable gifts! I love your detailed directions and photos too! thanks again!
I love this! I made one for my daughter for school. You can check it out over on my blog at myenchantingmemories.com.
Recent follower… 🙂 I LOVE all of your tutorials! You make it very simple to understand for beginner sewers. This one is by far my favorite little project–I am obsessed with purses of any kind! I’ve received MANY compliments on my clutches so far 🙂 Thank you again for the awesome tutorial–it’s a perfect “blueprint” for many other styles! I have you linked on my blog for this!
<3 Anngela
http://anngelasprettylittlethings.blogspot.com/2010/08/go-handmade.html
I FINALLY made one! Shocking, I know :). Thanks for such a great tutorial Annna, I can’t wait to make more! I posted about it here:
http://sewmuchado.blogspot.com/2010/08/noodleheads-gathered-clutch.html
this is so cute! thanks for sharing!
These are great and I will definitely be making a few for Christmas!
I need to make a purse for a fundraiser for cancer research. It will be a donation and the money will go 100% to fight cancer. I am planing to use your tutorial for my contribution. Thank you very much for sharing. Cissa
Super awesome pattern. I don’t normally like clutches since they have no straps. I made this thinking it would make a nice present but as soon as I was done, I put my wallet, keys and phone in it and now I think I will have to make another one for the gift.
I have challenged myself to make 30 bags in 30 days and this was my Day one bag. Pic at my blog here: http://diffusible.blogspot.com/2010/09/30-bags-in-30-days-day-one.html
I’ve been wanting to make this clutch for such a long time (well since May) and I finally got around to it. I have been so afraid of zippers but you made it look so easy. And it was!
This was such a great tutorial – so easy to follow! My clutch turned out really great – I can’t wait to make more. Thanks!
Pics are on my blog http://www.lovecuddlesew.blogspot.com
Thank you for a great tutorial. Pictures of my clutch at my blog http://jama-jujamy.blogspot.com/2010/09/sza-szycia.html
What a great bag! Thanks so much for posting!
I love this! I made one for my daughter’s birthday present. I used black velvet, and put a vintage rhinestone buckle across the center band. It looks stunning. She is a fashion major; if it meets her approval, I know it’s a winner. Thanks for the tutorial.
Thank you so much for taking the time to put the tute together! I did it today and linked you. http://www.risashoebox.com/blog/?p=1099. I did have a bit of trouble with attaching the zipper w/edges. Maybe shoulda read the comments first. Regardless, I’d do it again!
Olá!
Muito bonitos os teus trabalhos!
Boa continuação!
E se quiseres visitar o meu cantinho, fica aqui:
http://bijuticesecompanhia.blogspot.com/
Bjinhos
These little clutches are insanely cute! i have the perfect fabric that is just begging to be turned into this work of art. Thank you so much for the Tutorial!
Now I know what I’m making for friends for Christmas.
I just finished making this….its very cute!!
my only issue came with the lining….it doesnt fit quite right….seems a bit too big so my bag is bunchy inside 🙁 the corners with the zipper are also a little wonky, but for a first attempt by a relatively new sewer (me) I think it’s pretty good 🙂
hi rubberducky~
I’d recommend going back and using a larger seam allowance around the lining portion of the clutch, that should help with any bagginess, you could also trim away a bit of the seam allowance, too. Yep, I always think that practice does help a lot! 🙂
I really love your tutorial but I am royally stuck. You are sewing your lining and your exterior pieces together. Once you do that though, how do you turn it inside out???? Mine i just stuck like that. It’s all sewed up, how am I supposed to turn it inside out?
No one else has commented on this, so I must be crazy. But I’m super stumped.
Hey Ashlee~ yes, you probably just skipped the part where you leave a 3-4″ opening in the lining. So when you are sewing, you’re essentially sewing it inside out then pulling the whole clutch through the opening in the lining. Hope that helps!
I finally made one. Thanks for the darling pattern and tutorial.
Where in the world did you find an 8 in. zipper? I can only find 7 or 9 inch ones…and I love your zipper colors! Where are they from?? Thanks. (email bwal0073atgmail.com)
Just made my first one and I’ve decided this will be my go-to Christmas gift this year! Thanks so much.
Ahh, you are so patient! Thanks for your responses to the zipper questions – I loved your explanation: Do as I say, not as I do 😉 That fixed it! Zippers are now my friends thanks to you – way to share the love!
i loved making this clutch! great tutorial, so easy to follow. thanks! pictures are here:
http://storybookquilts.blogspot.com/2010/11/gathered-clutch.html
Thank you so much for this great tutorial. It has helped me overcome my fear of sewing zippers…I’m addicted to how fast I can make these (now that I figured out the zipper tabs!)
These are my “gift of the year” for all of my girlfriends!
http://lazydogquilts.blogspot.com/2010/12/fnsi-results-blog.html
Thank you! Will make a great teachers gift this year. ~Amy
i didn’t read all the comments so im not sure if this has been asked.
i don’t own a sewing machine right now, is it possible to hand sew this purse?
tia!
Thank you for the brilliant tutorial. I made two this week in one nap session. They were given to my older daughter’s teachers and they both loved them.
Thanks so much for creating this fun tutorial. I found this on Sew Mama Sew and I bookmarked it, just waiting for the courage to give it a try! I just finished making one for my sister to give her this Christmas, and it is wonderful! I can hardly wait to give it to her! Thanks again!
I finally tried this popular tutorial! So glad I did. Thank you!
http://www.amytriedit.com/2010/12/handmade-holiday-gathered-clutch.html
I loved making this clutch! I made a few as Christmas gifts and everyone loved them. I posted about it on my blog and linked you…
http://naturallychicmama.blogspot.com/2010/12/handmade-christmas-gifts.html
Great tutorial! I don’t sew, but my 11-year old daughter does. I shared the tutorial with her, and she made me a darling clutch.
Wow, I love the clutches! I will have to make a matching clutch for each of my new outfits. You are awesome!
Thanks so much for this tutorial! It’s easy to follow! I made three of these last week assembly line style (2 as gifts and one for me!). I posted pics and linked to your tutorial on my blog http://ejewelrydesigns.blogspot.com/
Thanks for the great tutorial. I made like 6 of these for Christmas. They were a big hit. I have a feeling this will be my go-to handmade gift for a while.
This clutch is on my sewing list for so long, but now I have the perfect occasion for making it – my sisters wedding! she wants me to sew her a clutch matching her dress and we chose your tutorial for it! 🙂 I’ll use cream white silk taffeta and lace on satin for the front band. I’m sure it will be perfect!!!
Thanks for sharing this wonderful tutorial!
Greetings from Munich,
Lucia
Just made it!! Love it, love it, love it! I decided to add a strap and ended up with the zipper head on the side closest to the ground when held and zipper closed. Switched the strap around and now the prettier side is facing me. ugh. I think I’ll live with it and change it later if it bothers me that much. I only have the patience to redo something once. 🙂 Thank you for a wonderful tutorial – this was the first zipper that has ever worked for me.
this looks like something my two teenage granddaughters might like very much, thanks for sharing
I finally got round to making some gathered clutches, thank you for the great tutorial! http://pioupioukids.blogspot.com/2011/01/busy-busy.html
Thank you for the wonderful tutorial, Anna! I’ve made 4 of these already, and I’m sure I’ll make more. I even put a little twist to the front. You can check it out here if you want…
http://madeonmaple.blogspot.com/2011/01/twist-on-gathered-clutch.html
I just made this! I love it!!!! Thank you for the tutorial.
Made it, LOVE it, thanks so much!!
Hello,
thank you very much for this wonderfull pattern und sharing it with us! You can find my first clutch with your link on my blog today. You sell also the same pattern of this clutch. What is the difference to this here?
Many greetings from
Heike
The pattern is different from the tutorial in the following ways:
– rights to sell clutches made using the pattern (on a home based scale)
– An additional styling option
– Two handle options
– Additional Mini Pocket Option
– My tips on installing zippers
– How to shorten a zipper
– Alternate zipper installation method
Thank you so much for the tutorial! You are so inspiring. Here’s what I have made for my friends.
http://www.muahristreasures.blogspot.com/2011/01/gathered-clutch-from-noodlehead.html
Great tutorial – thanks for making it! Here’s a link to a picture of the one I made today.
http://www.flickr.com/photos/lpinette/5393331761/
I love this so much I could weep! AWESOME and beautiful tutorial – I feel like dropping everything and make one right now. RIGHT. NOW. Thank you for the tute, Anna!
Thank you for sharing this how-to. You are awesome! 🙂
Hi, Anna! I also have an organizer tutorial and I placed a linked to your fab tutorial!
tosewwithlove.blogspot.com
Thanks so much for such an awesome tutorial. I made mine today! I posted a blog about it and linked to this page. Check it out. 🙂
http://thecreativelife1.blogspot.com/2011/02/hard-work-patience.html
Thanks for the great tutorial! I made one but added my little touch…I blogged about it & linked back to your tutorial :). If you would like to see mine dominiquescraftcouture.blogspot.com.
Thought you might want to know about this.
http://justsewsassy.com/2011/02/21/tuesday-tutorial-ruffled-zipper-pouch/
It’s so beautiful! I will be giving this tutorial a try!
Made one, love!!! Gonna make more and give them away, the first one is going to be a baby shower prize though. 🙂 Thanks for the great tutorial!
It’s done and it’s perfect, many thanks.
I finished today !! thanks
I finally made 2 of these… I think I’ve had this page bookmarked for a year…!http://el-petit-taller.blogspot.com/2011/03/petits-projectes-facils-simple-little.html
Thank you for the tutorial. I made one and added a strap. Posted pics of mine and added a link/credit to you at:
http://meanttocraftandsew.blogspot.com/2011/03/update-to-my-no-buying-challenge.html
Thank you for the tutorial. I made one with a strap and posted a pic of my project (with the credit/link to your tutorial) here
http://meanttocraftandsew.blogspot.com/2011/03/update-to-my-no-buying-challenge.html#comments
Thanks so much for this tutorial! Here’s a link where I blogged photos of the three I made!
http://nattyknowsbest.blogspot.com/2011/03/operation-make-more-stuff.html
SO happy i stumbled across this- looks like an easy to follow tutorial!!! thank you for taking the time to post- if I get around to doing it I will definitely link back to you!!
j’aime beaucoup vos pochette
c’est très mignon
je met un lien sur mon blog:http://lhistoiredunpetitchampignonrouge.blogspot.com/
I made this clutch and love it! Thanks for the tutorial! 🙂
Here’s where I posted it: http://fromblankpages.blogspot.com/2011/03/made-it-gathered-clutch.html
The clothes are really perfect choosen! Once I sew a smiliar one. Thanks for sharing..
I love this tutorial and I used it to make gifts of matching clutches for a bachelorette party I attended(http://theroaringlion.blogspot.com/2011/03/argyle-invasion.html. Thanks for such a wonderful post!
I just made 2 this weekend, one a little wonky but the 2nd one came out awesome – will share it soon! thank you!!!
Hello! It looks like you haven’t had a comment on this tutorial for ages…heehee. I made this the other day for my friend’s birthday and she LOVED. It was easy to throw together other than the zipper. I have now decided that zippers are of the devil. ☺ I had to play around with it to get it to finally work. Thanks again for your time and effort putting this together!
I bookmarked this tute a long time ago and just today I was browsing through my bookmark library and came across this once again. I have just about overcome my fear of sewing zippers and your tute majorly helped me overcome it even furthur! I made my first one and fudged it up really bad due to my not reading instructions properly but it turned out not too shabby. A hour and a half later, I decided to make another one, this time for my mother and taking twice the time to re-read and double check your instructions and it turned out beautiful! Pictures are on my blog and I will link back to this tutorial 🙂
Ha, just made two of these in the past two days! Perfect gifts, super easy, and really cute! Thank you for this great tutorial. Oh and I made the diaper tote and that was great and even quicker.
This tutorial was great! I made my own this weekend. You can see it here: http://fosterandboo.blogspot.com/2011/04/weekend-wrapup.html
Thanks for posting it!
Great project!!! Love it!!! Im new here. Do you have any handbags done?
I just found this tutorial from a link “weallsew’ on twitter. I LOVE IT!! i can’t wait to try it. i am going to buy a zipper today!
I just attempted this–very excited to try it. however I think with the interfacing things did not line up so great on mine. I measured very carefully etc. and lined things up what I thought was accordingly, however it is a tad off kilter. I think I will try again without the interfacing. I did the divider and the card holders–maybe it was all too much?
I am proud my zipper turned out decent!!
thank you for sharing! Here is what I’ve made: http://porannagazeta.blogspot.com/2011/04/kosmetyczka.html
Thanks anna for sharing ur toturial. I did it this morning,Look so cute with red colour cotton fabric. Http//sulamncraft@blogspot.com
I love this pattern! I’ve made two – blogged at:
http://betweenthetoys.blogspot.com/2011/04/gathered-clutch.html
Thanks so much for sharing this project!
Kate
where did you get this fantastic fabric! Please e-mail me
janell.cash@gmail.com
Thank you so much for this tutorial. I made them for Mother’s Day presents using some of my daughters outgrown dresses and they were a big hit! I blogged about it here http://mylittlekastle.blogspot.com/2011/05/happy-belated-mothers-day.html
This is one of my all-time favorite tutorials! Thanks so much for sharing it with us. Great, great job. I’ve made quite a few of these and even different versions so that my kids can use them – I’ve linked your site, as well.
I know this is quite a bit down the line, timewise, but this is just the cutest purse ever. I can’t wait to try it. The tutorial looks easy to follow. I’m from Hawaii so I’m doing it in Hawaiian prints. Should be uber sweet! Mahalo.
This tutorial looks awesome! I can’t wait to give the zipper technique a try. Thank you so much for sharing. 🙂
hi,
i wanted to thank you for that great tutorial.
i made 3 clutches and 5 are in progress 🙂
i hope, my english is not too bad 😉
but i wanted to leave a comment 🙂
(a few days ago i’ve already tried it, but it was’nt possible, i was always logged out).
if you want to have a look 🙂 :
http://stickandy.blogspot.com/2011/05/meine-neue-clutch.html
I love the way it turned out – thanks so much for the great tutorial! I linked to you here:
http://addicted2tutes.blogspot.com/2011/06/pencil-pouchgathered-clutch.html
Thank you for posting this great tutorial! I just made a clutch today (http://www.feathersinournest.com/2011/06/gathered-clutch.html) and I look forward to making more!
I did it. N loving it. But still need to do more practice on this. 🙂 love the clutch so much. thanks for sharing.
http://juzbetty.blogspot.com/2011/06/gathered-clutch.html
Wow! I think this is the most comments I have ever seen on something that wasn’t a giveaway. For good reason too! This is just a wonderful tutorial and a beautiful finished product. Love it! Definitely going to be making one (or more) of these. Pinning it now! Thanks!!
Love this! Thank you for the tutorial! The corners turned out perfectly using your tips. Blogged about here…
http://cajungirlquilts.blogspot.com/2011/06/gathered-clutch.html
This comment has been removed by the author.
Thank you for this tutorial! I’m new to sewing and this is a very useful information for me.
With yout help I’ve sewn my own clutch http://snowyulia.blogspot.com/2011/06/gathered-clutch.html
I just featured this on my blog here: http://chicaesartistica.blogspot.com/2011/06/ramblings-and-some-bookmarked-bags.html
What a wonderful little clutch and great detailed tuorial..thank you
made one check it out.
http://dantaesmom.blogspot.com/2011/06/gathered-clutch.html
I LOVE this clutch! I made one without any problems and then I changed it up a bit to make a diaper clutch. I linked you in my blog http://mimybellecreations-akasewingtherapy.blogspot.com/2011/07/clutch-purse-or-diaper-clutch.html#links
Thanks for sharing your creativity!
I made two of these today! Thanks for the great tutorial.
Linked this tutorial on my blog today: http://www.sarainklings.com/2011/07/on-my-sewing-agenda.html
I think these are just adorable and you’ve done a beautiful tutorial. Can’t wait to make many of them. Thanks for sharing! Sara ♥
hi, my name is limor. i want translate your instruction for clutch tutorial in hebrew and publish my blog. i can?
of course will be note your blog
thank you
hi limor, I’m sorry, I guess I’d prefer if you didn’t. please email me if you have more questions. 🙂
Hello
Thank you so much for your tutorial. I really enjoyed making it and I like the result. I just started a blog and I featured your pattern on it. Here is a link: Tien’s Hands: Noodleheads gathered clutch
Keep up the good work!
I just ran across this great tutorial. I finished my first gathered clutch last night. It’s is soooo cute. I can’t wait to make another!
I just made three of these for grad presents for friends. =) so cute and easy! thanks for the tutorial–i have zero experience sewing things like this and it worked great!
I just gave this a try today and was able to pull it together in about 2 hours. And it is my first zipper!! I couldn’t be happier! Can’t wait to make a few more. Wanted to thank you for easing me into it and giving me a result I am so proud of!
Hello Anna 🙂
I love this gathered clutch^^ It’s just that I can’t sew 🙁 Do you sell them anywhere?? That would be sooo great 🙂 Thank youu
My e-mail for answers: santosopel@aol.com
Lisa 🙂
Loved this cute little patch! Couldn’t quite figure out sewing over the tabs, but will have to try again! Thanks!
Hey Noodlehead! I stumbled across this tutorial through Pintrest I just made it for my sister’s brithday! What a great clear tutorial… I had no problems and I love the results! I just recently started a blog and so I did a post on this great clutch… mentioning you of course so go to http://modsprouts.com/?p=326 to see how it turned out. Great site… I will adding you to my list of blogs and I hope you do the same!
Rebecca
Yay! I’ve had this bookmarked forEVER and finally got around to it today- Wish I’d started sooner, I just knocked out a couple of them in no time! I know what everyone’s getting for Christmas this year 😀
What a great tutorial! I made a couple of these for a gift for friends. It was easy to follow and easy to do. Thanks for sharing! :). I will have pictures posted on my blog soon! (bluejcottage.blogspot.com). Thanks again!
here from Pinterest!
Do you have a store where I can just BUY one…?
thank you for the tute! will def give this a go once my sewing skills are up to par. (i have a hard time sewing a straight line!) ahhah! btw, im your newest follower 🙂 check me out at:
http://theymaysaythatimadreamer.blogspot.com and follow me if you like what you seeeee!
ciao,
dots.
Love your blog! I put your button on my page! I am hoping to get a sewing machine soon, so I hope to see more cool tutorials!
http://www.motherhoodmusicandbeer.blogspot.com
Thanks for blogging!
I’ve been excited to make this clutch for a while. I recently inherited a sewing machine from my grandmother and have been trying out some projects. Here’s how this one turned out:
http://berarder.blogspot.com/2011/11/sewing-gathered-clutch.html
I was stumped on what to make as a gift for two of my girlfriends for their birthday gift. This was perfect! I made up two pouches in one afternoon – quick, easy and so pretty.
Thank you for a great tutorial 🙂
Marilize
Love them!! I made 2 and posted about it on my blog. Linked to the tutorial… would love if you checked it out 🙂
http://adropatatime.blogspot.com/2011/12/gathered-clutch.html
thanks!!
thanks a lot for your tute!
merci merci! my friends are very happy with those presents!2 links with my homemades!
http://bycel.over-blog.com/article-encore-une-pochette-froncee-91892786.html
http://bycel.over-blog.com/article-la-pochette-froncee-87069335.html
Great tutorial! You’ve been featured on the Quality Sewing Tutorials blog.
We hand select only the best free tutorials and patterns for home sewers.
Grab a brag button!
I love these and have been looking for something almost exact. I have a small size bag like this one but with a built in mirror on one of the outside panels. I keep my basic makeup items in there and use it all the time to help me apply lipstick, etc. Have you made anything similar. I have been looking for a very long time now, but with no luck
Thank you
Wow, it is so inspire me, and make me can not wait to have my own sewing machine!!
Hi Anna,
I’m doing a craft fair just after Easter and was wondering if it was OK if I used this tutorial to make some to sell. I don’t want to steal your creativity or anything, but they are so cute.
hi tana,
thanks for your comment, the pattern is available and includes the rights to sell products made using my pattern: https://www.blog.noodle-head.com/2009/08/gathered-clutch-pattern.html
good luck at your fair. 🙂
Very beautiful clutch design. I love your fabric combinations -they work so well!
Great tutorial! I also had problems with the corners, but I didnt see the picture until after I was done. I plan on trying again soon and hopefully I’ll figure it out. 🙂
My Wristlet
I made 2 of these today, and they were so quick and fun! Your instructions are wonderful – thank you so much for sharing!! I don’t have a blog, so I can’t share photos, but I made one with bright green froggy print as a “pencil case” for my son (I can’t make anything but he wants one too!) – I left out all the interior parts for this one. I then made a pretty yellow/navy/aqua floral & bird print one for myself with the divider pocket and card holders. Love them both! Thanks again!
Lovely clutches and a lovely tutorial, thanks for sharing. I make wallets myself and always aim to make a tutorial, but its a very hard thing to do. I tried and I know this.
Hi. This tutorial is amazing – it has very clear pictures and instructions. I have linked you on my blog: http://mel-allwrappedup.blogspot.com.au/p/link-love-to-amazing-free-craft.html.
mel@allwrappedup
Just finished my very first one! IT worked out great, except the zipper tabs didn’t work out perfectly. I think it’s because I had to shorten a 22″ zipper and I messed up the 8.5″ measurement. Thanks for the tutorial!!
Anna! Waw. your tutorial is great. you just inspired me to make a few clutches out of my lying around scraps. Just about to add it on my one-note to do projects list folder.
Love the pictures and finally I understand how to put the zipper in. Thanks for that!
Simona of sewingadventuresintheattick.wordpres.com
I just sotp by to say thank you for sharing this tutorial! I have made several of those, one for me and the others as a gift. Unfortunatelly I just took a picture from the first one, perhaps in the future i should take more shots! Thank you once again 🙂
Thank you so much for this amazing tutorial! I made two of these into little Easter purses for my daughters. They turned out so cute. It was also my first time to sew with a zipper and couldn’t believe how easy you made it! 🙂 Here is how mine turned out. http://ohsewnice.blogspot.com/2012/04/easter-purse.html
Thank you again!
Sarah
Where did you get that fabric for the flowery green one?? I ABSOLUTElY LOVE IT!!! I wanna make one for myself!!
thank you very much for sharing this tutorial. i love it.
Thank you very much for the nice tutorial, I finally made a clutch today ;-); I can also share a trick for you how to make nice flat corners: i/o trimming the seam allowances you just sew them flat, you can find my tutorial here: http://bagsnstyle.blogspot.de/2011/08/freebooks-auf-englisch-freebooks-in.html
sabine
Hello from Switzerland, thank you so much for this great tutorial. I’ll try this a little later today
Obrigada pelo tutorial.
Já experimentei, de diversas formas.
Da uma olhada no meu blog: http://trapospolibel.blogspot.com/2010/12/pecas-em-pormenor.html.
I just made this clutch last week and I LOVE it! It turned out super cute and everyone that I have shown it too thinks it is a great -looking purse! Thanks so much for the tutorial! 🙂
I love this, and have just bought a zip, so I can try it out. Can’t wait to have a little Mummy-only clutch to use when I go out kid-less!!
http://button-lover.blogspot.com.au/2012/06/mini-gathered-coin-purse.html
I used your concept for these little coin purses for presents. A very cute result!
I’m going to try to make a full sized clutch in the coming weeks.
I love the look.
Thank you for this inspirations and sharing your talents in creating something pretty 🙂
awesome and cute! I never thought I’d find anyone else using that awesome flower print fabric ever either! you even found some in the blue and green color! I made a belted happi coat with mine :3
http://www.etsy.com/listing/86750452/gathered-zippered-clutch-brown-flowers?ref=exp_listing
http://krissyanne.com/funky-shapes-are-fun/
Is this your pattern? Some people just dont get it..
I just love your blog and this pattern! It was so easy to understand with all the pictures !
Love from Norway, Johanna
Yep! Krissyanne has purchased the pattern though (which includes the right to sell). Thanks for watching my back though. 🙂
thank you for sharing 🙂
I’m heading fo my fabric stash to start some gifts for friends and family How cool is this pattern? WAY!
What a neat way to add the ruffle look. I will have to make one thanks for sharing.
I’ve been looking at this tutorial for a long time and finally pulled it off! Love it and it was so much fun. I can see how making multiple variations of this could be very addicting 🙂
Hello de Belgique!
bravo pour vos créations!
mamzelle Lilie de “coup d’pinceau ptits cailloux et confetis”
I have been wanting to make this bag for awhile — I think I will do it soon. Quick question when you say stitch gathering stitches, how exactly do you do that? Thanks =)
Hey Lyanna, just use the longest stitch length on your machine (usually a 5.0). 🙂
Merci beaucoup, c’est très joli…! Je viens d’en faire une…
Great tutorial — quick question though, how big do you make the zipper tabs? This might seem lame, but I’ve never made zipper tabs before =)
Thanks!!
merci pour ce tutoriel c est une tres jolie réalisation
I didn`t understand. It is very difficult….
I’ve been wanting to make something like this for years. I’m not that good at sewing but because I always wanted to make a clutch. I’m going to make one tomorrow. Wish me luck. I love the flower pattern you used for one of the clutches. I’d love to make my own wallet too. This could be used for a wallet. It’s just usually wallets have more pockets.
Thanks for this tutorial! it’s wonderful!I love this!
Thanks for the great tutorial!It’s so beautiful! I love it!!
I just finished four clutches for my bridemaids! thank you for your easy instructions. It was a lot of fun and I wish I had made more for myself and others.
Thank you very2 much..I really love it!
That’s so great! I’m a new sewer and will definitely try this soon! Thanks for sharing!
Spot on with this write-up, I really believe this amazing site needs far more attention.
I’ll probably be returning to read more, thanks for the info!
Feel free to visit my webpage : free iphone
Thank You!! I plan to make these for my six nieces who are getting to that age that you just don’t know what to get them 🙂
thankyou for this tute – made one for my mum for christmas. 🙂 will link back when i’ve blogged about it!
Thank you so much for the tutorial…I have made 2 so far for christmas gifts and now need to make one for myself!!!
Have a lovely Christmas!
Lisa
Thanks so much for sharing this pattern. I gave it a whirl earlier this month and I’m pretty pleased with the outcome! I posted about it on my blog: http://enchantedbybooks.wordpress.com/2012/12/26/gathered-clutch-december-2012/
i would never be able to do let alone finish this! you are very talented!
Hello Anna,
thanks a lot for this tutorial.
I’ve done it yesterday!
Have a look:
http://ines-stempelsucht.blogspot.de/2013/02/die-gathered-clutch.html
Greetings from Germany
Ines
Olá amei suas necessaire…seu blog é magnifico.Abraço 🙂
http://www.joaninhaxavierbds.blogspot.com
Greatest zipper tutorial EVER! Exactly what I’ve been looking for!! Thank you for that. I finally like the Zipper corners on a bag that I’ve made!
So cute!!
I have been eyeing this tutorial for quite a while now, and finally went ahead and made one. I added a couple of extra spaces for cards and I just love it! Thank you for this awesome tutorial, it was my first time making a zippered purse with a lining and it turned out so professional looking.
Thank you so much for a great tutorial! My clutch turned out beautiful 🙂
I am so excited for this pouch! I need the pouch’s final size to be 9.5in long and about 4 in tall. How would I change the pattern to have this be possible?
Thank you so much!
Hi Abby,
I’d just try cutting everything and 1.5 inches wider and about and inch less tall.
🙂
Many many thanks for this lovely tuto ! have a nice week end
I’ve made lots of these in the past, but never commented. I love how they turn out (as usual!) This time I changed the zipper pull and added a swivel clip and strap. I’ve linked to you in my mini tutorial – http://threadridinghood.com/wordpress/add-a-wrist-strap-to-a-clutch-tutorial/
~ Sherri@threadridinghood.com
As usual, I’m late to the party! I finally made one of these awesome clutches and really love it! http://roonieranching.blogspot.com/2013/07/gathered-clutch.html
I made this a second time — this time with burlap! Here’s how it turned out: http://roonieranching.blogspot.com/2013/08/gathered-clutch-collaboration-with.html
I’m so excited that I got the zipper end tab things to work right this time! Amazing what happens when you actually follow the directions, huh? What a terrific pattern! Thank you again for all your hard work.
tks, it’s cute
i made it it looks too good. thank you for the tutorial : such a lovely clutch.. hoping to see more in future.
I love your little bags, and I know these would be perfect for my daughter, who is just learning to sew at the age of 47!! I would love to print off these tutorials, but don’t want all the comments. Is there a way to do this?? Thanks, Irene
Thanks for this lovely tutorial. I’ve used it twice now and just love it!
I know this was posted three years ago but thanks to Pinterest its still alive! I just made one of these cute bags and will make 2 more to give to my 3 daughters for Christmas filled with nail polish, lip gloss and girly stuff. They will love them. Thanks for the tutorial!
i loved the way you have secured the zipper..Really cool..Thankyu for sharing this tutorial..in india it ia said tht “knowledge increases when it is shared!” thanku so much for sharing
very good information and Inspiring & Interesting.
success always
http://tokoobatbiusasli.blogspot.com
Can’t wait to give this a go! It is a perfect idea of gifting
Can’t wait to give this a go!
Hi!
Thank you for the great inspiration and the tutorial! I have made no clutches but tiny littly zipper bags out of it and everyone loves them!
Thank you! Greetings from Bavaria, Germany
Désirée
I just made one last night, it’s such a great pattern!
شركة رش مبيدات بالمدينة
شركة رش مبيدات بالدمام
شركة تخزين أثاث بمكة
شركة رش مبيدات بالدمام
شركة كشف تسربات
شركة تخزين اثاث بالمدينة
شركة كشف تسربات
شركة رش مبيدات بجده
شركة رش مبيدات بالخرج
شركة رش مبيدات بالدمام
شركة تخزين اثاث بالدمام
شركة عزل خزانات بالرياض
شركة مكافحة حشرات بالرياض
شركة تخزين اثاث بالرياض
شركة نقل اثاث الرياض
شركة كشف تسربات المياه بالرياض
شركة تنظيف بيارات بالرياض
شركة تسليك مجاري بالرياض
شركة جلي بلاط بالرياض
شركة تنظيف كنب بالرياض
Thanks for the tutorial. I just made my first clutch and predictably forgot to add the divider. (-_-) That being said, it was still fun and easy to make!
Очень здорово,спасибо за мастер класс!
i’ve just made mine in purple tones and I have to say that it came out beautifully. I simply love it and the tutorial is great so even I a complete noobie to sewing can make something quite adorable and professional looking. Who knew I had it in me!:D
This was such an amazing tutorial! The purse I made was easy and looks awesome!
I bought this pattern a couple of months ago at your shop. Here is the result : http://quilteuseforever.wordpress.com/2014/09/06/ma-liseuse/#comment-8046
Thanks for this beautiful idea!
Amitiés de France
These are beautiful! You have so much patience!
http://www.eatwearwander.com
Im sorry, I’m really confused with the piece cutt instructionsinstructions. .after re_reading over and over and then reading through rest of tutorial with all the corrected errors I’m about to give up.
Very cute! Great tute! Have to give it a try
Beautiful Purse. Thank you for the tutorial.
Hooray!! I made this! The instructions and photos were pretty easy to follow. I have practically zero experience with sewing and learned some neat stuff making this today. Will try again with a divider next time. Thanks for putting this together!